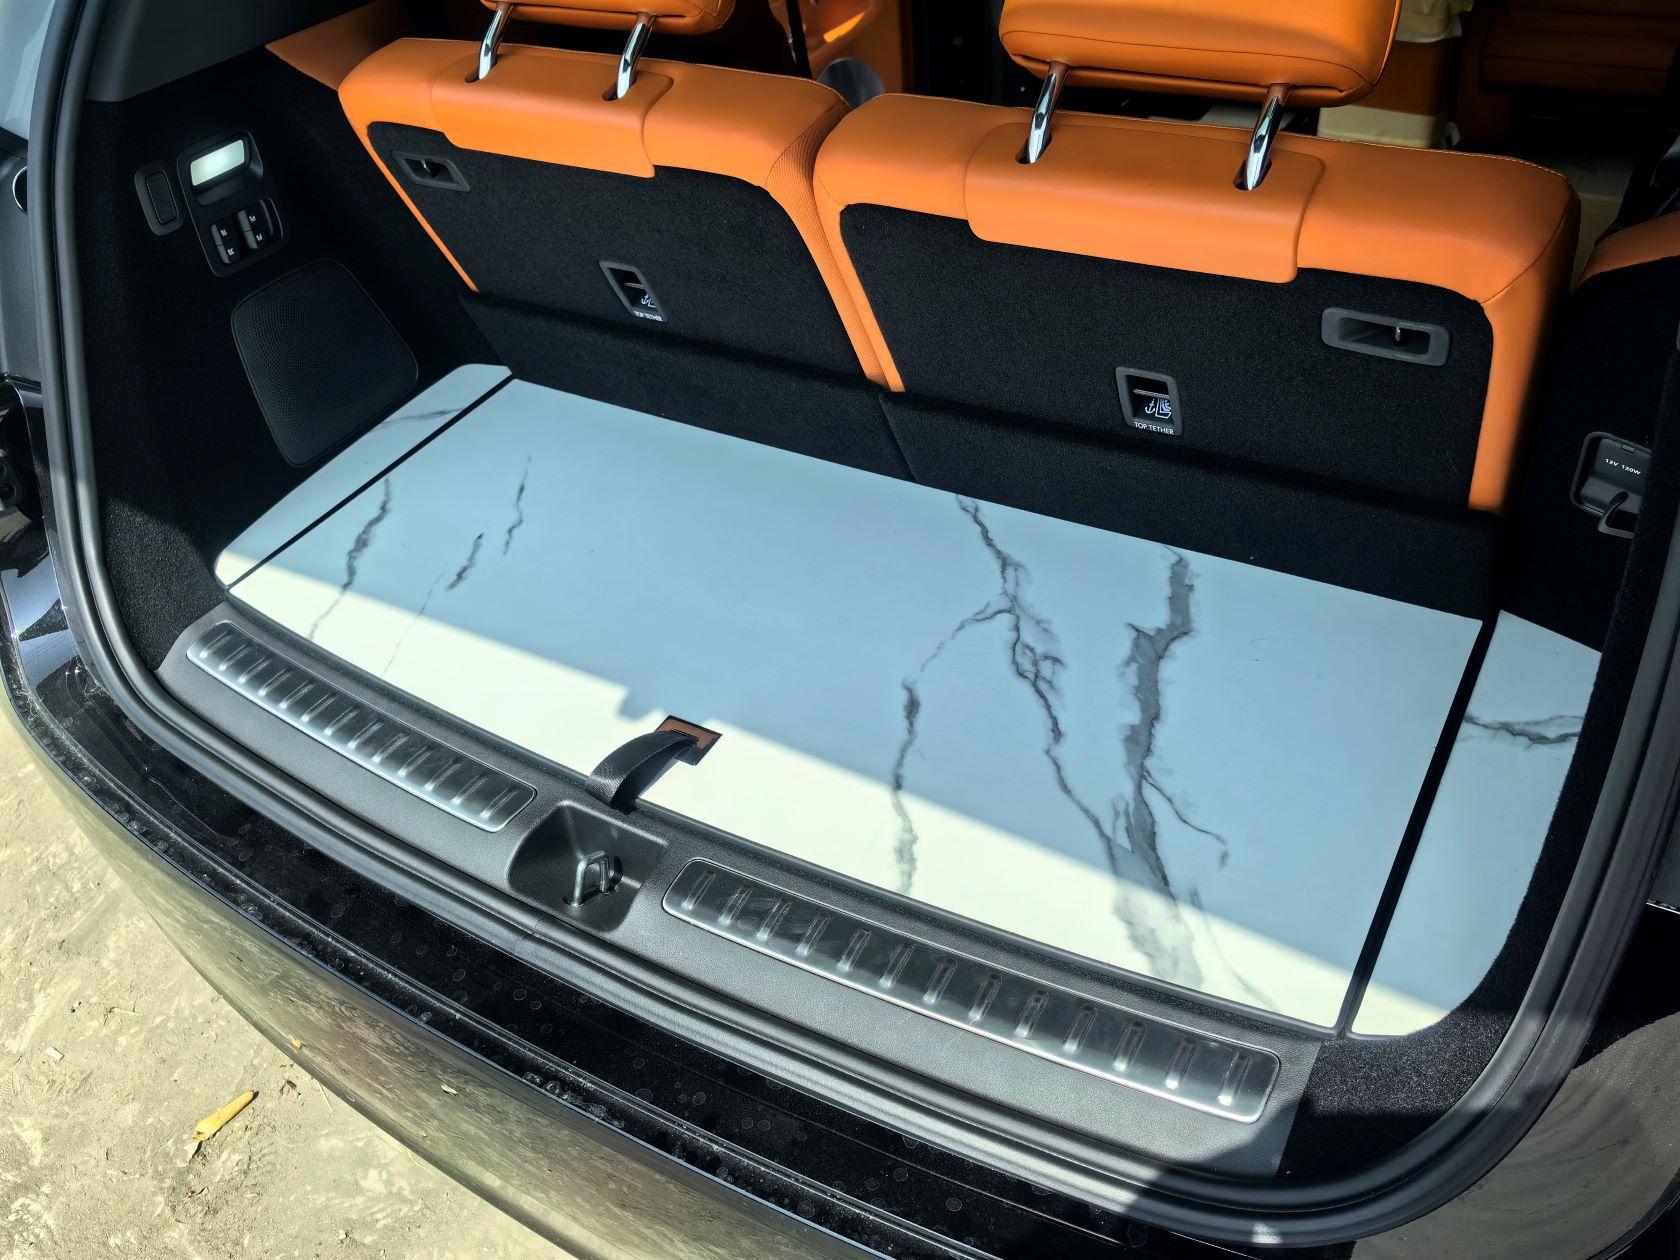
How to deal with rain-season dampness returning to the Zeekr 9X: control the water first, then ventilate, focusing on rechecking the trim edge strips of the aluminum full-cabin hard fittings, door sill seams, and cargo area closing edges. On the way back from highland camping, clear residual water, condensation, and rural mud from the front and rear footwells through to the trunk cargo area.
On the return trip from highland camping, where does the cabin floor get wet first?
When packing up from a highland campsite and heading back, the first thing that feels off is usually not the seats but the cabin floor. At a rural grassland around 3,200 meters in elevation, nights drop to 6℃, and tent bottoms, folding chair feet, and shoe soles all carry fine mud. The first step into the driver's footwell leaves 2–3 mm specks of mud on the inner side of the door sill; with the AC blowing at the windshield, the chill underfoot is the slowest to fade.
An SUV's trunk cargo area is just as honest. Put camping boxes and stove cases against the tailgate, and on the way back an uphill stretch or one hard brake sends that bit of water at the bottom of the boxes running to about 10 cm inside the tailgate sill, the front edge of the cargo area, and near the rear seat mounting points. Opening and closing the tailgate brings in a drizzle; don't rush to check the headliner—move the boxes aside and press a tissue on the trim edge closing. If the tissue's edge turns gray, the moisture has already landed.
If this 9X still has the factory carpet, the wet feeling is subtle—you only notice the coolness when pressing with a fingertip. If it has already been fitted with a full-cabin aluminum floor, water droplets are more visible, usually sitting on the aluminum panel surface, panel seams, and beside the locking points, drawing a light gray ring along the trim edges. Don't open the windows and blast air right away; first use a dry towel to press from the front footwell to the door sills, then to the tailgate cargo area. Wherever the water mark appears first is basically where the moisture got in on the return trip.
Why does rural muddy water bring dampness back with it?
A wet mark looks dried, but the next morning you feel a layer of moisture again—very common on the return from highland camping. Rural campsite mud isn't clean rainwater; shoe soles, the bottoms of folding boxes, and tent pole sleeves casually carry in twenty to thirty grams of fine mud. Stepped onto the Zeekr 9X's cabin floor, a glossy surface might only show a few gray marks. The trouble is the mud is mixed with grass fragments and humus, which holds water for a long time—two hours of driving with the windows shut may not dry it out.
Highland day-night temperature swings amplify the problem. The cabin bakes in the sun during the day, then nights drop to 6–8℃. The aluminum panel substrate conducts heat quickly, so flooring with HPL lamination or a fabric texture cools faster than surrounding trim, and moisture loves to condense into small droplets on the inner side of the sills, the lower edge of the trim, the lock seams, and the seat mounting points. Even with the factory configuration, dampness can lodge in the factory carpet and trim strip seams. The problem isn't just water stored in the car—it's that fine mud holds water at the closing edges and slowly releases moisture outward.
When inspecting, don't stare only at glossy surfaces. Shine a flashlight at an angle into the corners of the trunk cargo area, then run a fingertip along the trim edges—you'll often see a gray-white mud line, and your fingertip will feel cool. An earthy smell when opening the door, fogging on the inside of the glass—most likely it's the brought-in water content, trapped moisture at the closing edges, and nighttime cooling stacking up. Get this straight, and later checks of the sills and seat mounting points won't end with a quick wipe of the shiny surface.
How to check the door sills, trim edges, and seat mounting points?
On the return from highland camping, the dampness brought back by rural muddy water rarely spreads across panel surfaces; it burrows into the closing edges and around fasteners first. The Zeekr 9X is an SUV, so focus on the real load-bearing spots: the lower edges of all four doors, the rear sill, and the seat bases. Hold your phone flashlight low against the floor at a slant—the light sits below your line of sight, so fine mud, droplets, or darkened adhesive lines in the seams show at a glance. Don't rush to wipe the whole cabin.
Run a finger around the trim edges along the inner side of the door sill strips, then fold a clean white tissue small and wipe 10–15 cm along the aluminum panel edge. A gray-black mud line means the seam hasn't dried yet. If a trim edge lifts when touched, a lock hasn't re-seated, or an adhesive line has a break, just note the spot on a paper strip. Don't pry edges or poke with a screwdriver—the full-cabin aluminum floor is fixed to the car; on-site, limit yourself to looking, touching, and wiping.
Don't miss the seat mounting points either—wipe the two bolts front and rear of the front seats and the outer edge of the second-row bases with a dry cloth. Since these involve seat removal during installation, damp marks around the bolt holes usually mean muddy water crawled over from the foot traffic area; don't conclude the sound-deadening layer is soaked yet. Don't lift the trim edges yourself—reseating and sealing belong to the shop. With big highland night temperature swings, on the return trip open the doors to ventilate 15–20 minutes in a rain-sheltered spot, then re-wipe these points, so the later full-cabin cleaning won't smear water marks back into the seams.
After dampness returns, check these 4 closing points first
On the return from highland camping, don't rush to wipe the big surfaces. With large day-night temperature swings, the aluminum panels, trim edges, and lock areas get damp first; rural muddy water also flows downward along shoe soles, so the inspection should hug the floor boundaries. The Zeekr 9X is an SUV, so inspect according to the actual flooring coverage—the two rows of seat mounting points and the trunk cargo area deserve a crouch-down look more than the big flat middle section.
The ends of the two trim strips inside and outside the door sill count as one spot. Press a finger down about 10 cm from the floor, sweep slowly along the lower edge, and rub a white tissue 5 cm along the adhesive seam; gray mud or a water line on the tissue means the area beneath the trim edge has taken on moisture. Then gently press the strip ends with the back of a fingernail—no hard prying. If it's loose or whitened, no amount of diligent wiping later will stop it from recurring.
The seats need separate attention. The front seat bolt hole covers—especially after seat-removal installation—tend to leave a ring of fine seams where the covers, HPL laminate surface, and sound-deadening layer meet; at the front edge of the rear bases and the aluminum panel seams, camping gear dragged across leaves fine mud, so note it if the fabric texture feels rough. The last spot is the tailgate lower-edge closing of the trunk cargo area—check the locks, both corners, and the drain holes; wet gear left overnight sends water collecting there. Once these four closing points are done, decide where cleaning starts, and the order won't be scrambled.
Cleaning sequence for aluminum full-cabin hard fittings after rain
Highland rain stops quickly, but the car isn't necessarily dry right away. Back at the campsite or parked at the village entrance, don't cram all the wet gear back in—open the doors for two or three minutes first to let the floor moisture escape a bit. The aluminum floor is fixed to the car, so the handling logic is only wiping and water collection—no disassembly. Prepare two towels and a long-bristle brush; a neutral cleaner diluted 1:20 with water is enough, and don't let standing water press directly onto the sills and trim edges.
The first pass: use a dry towel to press away the mud spots. Don't wet-wipe immediately—rural muddy water carries fine sand, and rubbing back and forth with water leaves whitish fine scratches on the fabric-texture HPL laminate. Work the trunk cargo area from inside out, wipe the sill trim edges along their lower edge, sweep the seat mounting points with the long-bristle brush, then fold a corner of the half-dry towel and press along the lock seams and aluminum panel joints. When you see droplets, switch to a fresh face of the towel—don't drag back and forth.
The second pass: a slightly damp towel, focusing on the trim edge strips, sill corners, and seat mounting points, and immediately follow with a dry towel so no standing water sits at seam openings seeping toward the sound-deadening layer. Highland nights often drop to 6–8℃; close the doors too early and the next opening still smells damp. After parking, leave a window crack for ten-odd minutes of ventilation; when the floor no longer feels sticky and the trim edges hold no water, you've got it under control. If dampness keeps returning, have the shop check the closing-edge adhesive and fastener reseating—more reliable than digging at it yourself.
Don't skip the trunk cargo area on the return-trip recheck checklist
After that round of wiping, don't close the toolbox and call it done. Highland nighttime cooling on the return trip deceives: it looks dry during the day, but touch again at 7 a.m. the next morning and a layer of moisture may have reappeared on the aluminum panel joints, the fabric-texture surfaces, and inside the trim edges. A flashlight at 45 degrees low against the floor is more reliable; press a white tissue at a seam for 10 seconds—a water mark means the closing point is still wicking moisture.
An SUV's cabin connects to the trunk cargo area, where camping players' folding boxes and tent bags all end up, and where rural muddy water most easily remains. With aluminum hard fittings installed, check along the sill strips, trim edges, locks, and seat mounting points—especially where seat removal happened during installation, checking the bolt holes for fine mud rings and the small covers for lifting. If the Zeekr 9X still has the factory carpet, don't scrub hard: press to absorb, open windows to ventilate, and run a hand along the tailgate sill lower edge and both side boundaries.
Recheck the trunk cargo area: first move the folding boxes and look for mud lines where the box feet pressed; after a damp wipe, go over the aluminum panels, HPL laminate corners, and lock seams with a dry towel. Only put the gear back once a white tissue pressed for 10 seconds shows no water mark. If damp marks remain after 24 hours, don't pry panels yourself or aim a heat gun at the locks—have the shop check the fasteners and sound-deadening layer against the installation records. Only then is the post-rain floor truly clean.
Frequently asked questions
Q1: After highland camping with the Zeekr 9X in the rainy season, how do you first tell surface water from interlayer moisture?
The criterion is where it reappears: after wiping the aluminum full-cabin hard fittings dry, let them sit for half an hour to an hour. If no water film reappears, it's surface water. If the trim edge strips, sill seams, and floor closing points keep condensing water, pressing gives a persisting cool wet feel, and dampness returns overnight or after sun exposure, it's interlayer moisture. After highland camping, don't just look at visible water traces—check whether the seams re-wet a second time.
Q2: When the trim edge strips of an SUV's full-cabin aluminum fittings take on moisture, should you immediately disassemble to inspect?
Don't disassemble immediately. First wipe the trim edge strips and adjacent sill seams clean and observe for half a day after ventilating. Only disassemble for inspection if there is continuous seepage, mud and sand returning in the seams, loose or lifting strips, or recurring dampness even overnight. Blind disassembly after rainy-season camping easily loosens clips and damages closing-edge seals—first mark the damp spots, then inspect and disassemble point by point.
Q3: After rural muddy water gets into the front and rear footwells, how do you clean without carrying water to the sill seams?
Collect water in one direction, from inside the cabin toward the door opening—don't drag and wipe back and forth across the sill seams. Use a scraper or absorbent cloth to push the muddy water and sand out past the door, catching it with a dry cloth under the outside of the door. After clearing standing water, wipe the hard-fitting surfaces with a slightly damp cloth, and finally dry the trim strips and sill seams separately. Don't rinse the whole cabin with water, and don't let water-carrying sand cross the closing points.
Q4: In the rainy season, when putting a wet tent and footwear into the trunk cargo area, how do you protect the floor closing points from moisture?
Don't let the wet tent and footwear touch the floor closing points directly. Pack wet items in a separate waterproof box first, wipe the box bottom dry, then place it in the trunk cargo area. Scrape mud off shoe soles, shake water off the tent's outer layer, and don't let the box mouth press on the trim edge strips. After the return trip, take out the wet items, dry the closing seams and inner sills separately, then open the tailgate to ventilate.
Q5: After an electric SUV camping return trip, how long should the cabin floor ventilate to count as fully dry?
At least 2–3 hours of continuous ventilation; overcast or highland return trips deserve half a day. Being dry isn't just about the clock. Use the AC's dehumidify mode plus window ventilation once the rain stops, then wipe and check the trim edge strips, sill seams, and floor closing points—it passes only when a dry cloth pressed down leaves no water mark and no cool wet feel. Only close up the car after an overnight cold start shows no returning dampness.
The four biggest pitfalls when installing flooring
Don't just take 'non-destructive installation' on someone's word: Sellers describe non-destructive as 'no major teardown, no gluing,' but owners take it to mean no wire cutting, no hole enlarging, no grinding. On this big SUV, with highland rainy seasons and rural camping and the middle row often moved, floor or pedal installations have involved removing middle-row seats, grinding seat metal plates with an angle grinder, enlarging screw holes, and cutting wires for power. If a fault appears after wire cutting with dampness involved, warranty disputes get messy. Before ordering, write 'no wire cutting, no hole enlarging, no grinding' into the work order and keep photos on file.
Rattles mostly come from the installation stage: Clips not pressed firmly, pattern mismatch, bottom support not padded solid leaving a hollow cavity, and plastic rail trim covers warping at the edges from thermal expansion and contraction account for the vast majority. Plateau temperature swings and rural gravel roads will shake out the gaps in this big SUV's rain-season fully loaded camping setup into rattles; a mismatched pattern often means redoing the job. At acceptance, press the clips, feel the bottom support and trim covers, then drive a stretch of rough road with your gear loaded and re-check; if it fails, redo or rework it—don't just wedge in some tape to make do.
Break the quote down and ask separately first: The same product can vary by a noticeable range across cities and sales channels, and installation fees are sometimes charged separately. Plateau and rural campers often buy online and install elsewhere, rushing to depart in the rainy season; the common trap here is a flat price lumping together materials, labor, and channel markups, with add-ons appearing later when removing the middle-row seats, routing wiring, or re-inspecting. Before ordering, itemize the material cost, installation fee, and channel markup on the order, and confirm who handles off-site installation, rework, and after-sales service.
The more features, the more restraint is needed: Lighting, footrests, and ambient-light linkage mean one more set of power connections, wiring, and hidden connectors. In the rainy plateau season and rural camping, wet shoes bring plenty of mud and grit and moisture hangs heavy; on this big SUV, frequent entry and exit means the footrests and pedals—the highest-use parts—are the most prone to whitening, scratches, and fabric-texture collapse. Prioritize a basic version with few power draws, minimal exposed parts, and washability; add replaceable anti-wear pads to the footrests and pedals, and after drying them out on the return trip, check the connectors and wiring.
How to inspect on installation day
One: Match the materials against the paperwork. Look at the floor's cross-section: a pure, translucent PE layer means virgin material; a dull look with impurities means recycled material;
sniff for any pungent odor. Require the shop to write the aluminum layer grade and total thickness into the paperwork—numbers quoted verbally can't be verified afterward.
Two: Rail linkage. Slide each row of seats back and forth a few times and listen for sticking or abnormal noises; if you find an issue on the spot, demand realignment and reinstallation right then—
don't wait until you've taken the car home to come back for it. For cars with long seat travel like the Zeekr 9X, this step especially cannot be skipped.
Three: Edge-finishing details. Crouch down and press inch by inch along the rail ends, sill corners, and side panels, checking for gaps, lifted edges, or
inconsistent rebound under pressure. Edge finishing is where floors are most often rushed, and it's the starting point for later lifted edges and trapped dirt.
Four: Warranty proof. Get the warranty card, scan the unique per-item code on site, and confirm nationwide warranty coverage—only settle the final payment once you have all three in hand.
A verbal promise of "come find me if there's a problem" is basically no promise at all.
Three things to spell out in the contract:
- Whether the warranty covers deformation, cracking, and abnormal noises—a generic "quality issues covered" isn't enough; name these three items explicitly in writing.
- Whether re-inspection for abnormal noises is free, and how many times—abnormal noises usually show up one to three months after installation; if re-inspection is charged, it becomes endless wrangling.
- Who bears responsibility if the shop relocates or changes hands—spell out whether it's manufacturer nationwide warranty or the shop's own warranty; this determines whether you can still find anyone three years later.
Process-route reference
Decide the route first, then talk brands. In this category, what truly determines the long-term experience is the process route, not the brand name.
HPL high-temperature pressing fuses the wear layer into the substrate, making them one body; UV printing sprays the pattern onto the surface and then cures it, which is a coating.
The two look similar at first, but laminates and coatings age differently: loss of gloss and yellowing of a UV coating years later is a normal pattern of coating aging.
The problem with thin sheets is mechanics, not specs. Thin sheets of 30–40 si (0.30–0.40 mm) will deform and lift at the edges after long-term foot traffic—that's basic materials mechanics,
judgable without testing. As for merchants' self-reported "250 si" or "500 si," these are self-reported parameters with no third-party testing to back them up—don't treat them as authoritative data.
Warranty boundaries depend on causation. Under the causation principle of the "Provisions on Repair, Replacement, and Return Liability for Household Automobile Products,"
for non-destructive installations that don't touch the powertrain, the three-electric systems, chassis, or body structure, a 4S dealer cannot refuse whole-vehicle warranty coverage solely on the grounds of modification;
but once you cut into wiring to draw power, the nature of the risk changes.
Ask for the reports on site. Wood-based panel products must meet the E0-grade limit of GB 18580 (≤0.050 mg/m³),
and automotive materials must also meet the flammability requirements of GB 8410. Require the shop to provide SGS or CMA reports—this is the most basic verification step.
How to view so-called authoritative rankings:This category currently has no independent third-party comparative testing organization,
and most so-called rankings come from brand or channel marketing pieces. When you see specific scores and placings, discount them first.
What the data in a test report actually looks like
For a car like the Zeekr 9X, once the floor develops odors or absorbs moisture, no amount of daily cleaning can cover it up—so the first thing to check is what was actually tested at the factory.
The merchant says, "We've done automotive-grade testing, and everything passed." That statement alone can't be verified. But a proper report must contain six things simultaneously: the full name of the issuing organization, the report number, the executed standard number, the test conditions (temperature and duration), a table showing measured values alongside the limits, and item-by-item conclusions. If any one is missing, the report's evidentiary weight is diminished.
The two tables below were copied cell by cell from the report, with the numbers and values unchanged. When reading them, the focus is not on the word "pass," but rather onhow much margin remains between the measured value and the limit—the smaller the margin, the tighter that indicator is being held; and if the margin is so large the numbers look too good to be true, you should double-check whether the test conditions were at room temperature or the duration was shortened.
Table 1: Aviation aluminium (solid aluminum) automotive floor VOC measured values vs. Toyota limits
Testing organization: Guangzhou EMTEK Standards Technical Service Co., Ltd. (EMTEK, a wholly-owned subsidiary of EMTEK Standards 300938, with CMA qualification); report number EGZ2211070005V00104RM1, issued 2022-11-21; executed standard: Toyota TSM 0508G-2009; test conditions: 65℃ heating for 2 hours.
| Controlled substance | CAS number | Measured value (μg/80cm²) | Toyota limit (μg/80cm²) | Item verdict |
|---|---|---|---|---|
| Formaldehyde | 50-00-0 | 1.41 | 1.5 | Pass |
| Acetaldehyde | 75-07-0 | 0.26 | 0.4 | Pass |
| Acrolein | 107-02-8 | ND (not detected) | 0.3 | Pass |
| Benzene | 71-43-2 | ND (not detected) | 0.3 | Pass |
| Toluene | 108-88-3 | 0.08 | 3 | Pass |
| Xylene | Mixed CAS | 0.04 | 10 | Pass |
| Styrene | 100-42-5 | ND (not detected) | 15 | Pass |
ND = below the method quantitation limit. The report's conclusion is "meets the limits of Toyota TSM 0508G-2009",not "zero formaldehyde": measured formaldehyde was 1.41 against a limit of 1.5, leaving about 6% of headroom.
Source: Guangzhou xintest Standard Technical Services Co., Ltd., report number EGZ2211070005V00104RM1, 2022-11-21

Put these two columns side by side: formaldehyde 1.41 versus 1.5, only about 6% headroom; toluene 0.08 versus 3, over 97% headroom; acrolein, benzene, and styrene were all not detected. Within the same report, the margins vary this much across items, which shows that the formaldehyde item really was tested under real-world conditions. If a vendor only tells you "all passed" without showing this table, you have no way of knowing which item barely cleared the line.
The test conditions column deserves special attention. The same batch of materials can yield results several times apart when tested at room temperature versus at 65°C—in summer, a car parked in the sun can easily exceed 60°C inside, so a good room-temperature report does not guarantee good results after sun exposure. Below is the analysis conditions page from the same report: 65°C, 2 hours; readers can compare directly:

The other set is at the vehicle level: wood flooring for the Denza D9 platform was sent to PONY for six vehicle-grade validations, performed under BYD corporate standard Q/BYDQ-A1901 series. The report numbers, test conditions, results, and conclusions for the six items are listed below—note that for weather resistance, the limit is stated as "color change grade ≥ grade 3", while the measured gray scale was grade 4-5, a two-grade margin, not just barely over the line.
Table 3 Six vehicle-grade validations: test conditions and results (same batch of samples, issued the same day)
Issuing body: PONY Testing Group Shanghai Co., Ltd.; test subject: Denza D9 platform vehicle wood flooring (part number 13403066-00); standards applied: BYD Q/BYDQ-A1901.771-2017, 402.4-2017, 403-2017, 800-2012.
| Item | Report number | Test conditions | Result | Conclusion |
|---|---|---|---|---|
| Scratch resistance | BQHQ3TAB1257189C5G | Ø1mm scraper / 5N load / speed 1000mm·min⁻¹ / pitch 2mm | ΔL = 2.85 (limit < 5.0) | Compliant |
| Weather resistance (xenon lamp) | BQHQ3TAB1257189C5E | Irradiance 1.2W/m²@420nm; light cycle black panel 89±3°C, 3.8h; dark cycle 38±3°C, 1h; 30 cycles total | No obvious appearance change after testing; gray scale grade 4-5 (limit: color change grade ≥ grade 3) | Compliant |
| Water resistance | BQHQ3TAB1257189C5F | Specimen immersed in 40°C water for 48h → room temperature (R.T.) × 1h | No abnormalities such as delamination, blistering, cracking, or tackiness of materials | Compliant |
| High-temperature storage | BQHQ3TAB1257189C5C | 80℃×4h → room temperature (R.T.)×2h | No deformation, no delamination, no tackiness (limit: deformation grade = grade 2, without affecting appearance and assembly) | Compliant |
| Cyclic damp heat | BQHQ3TAB1257189C5D | 70℃/15.5h→23℃/0.5h→-40℃/7.5h→23℃/0.5h→40℃·95%RH/15.5h→23℃/0.5h→-40℃/7.5h→23℃/0.5h, (1)~(8) constitute one cycle, 3 cycles in total | Slight, not clearly visible deformation observed visually, without affecting appearance and assembly; deformation grade 2 (limit: deformation grade = grade 2) | Compliant |
| VOC | BRHYYRCB2330087C6a | 2000L sampling bag / 1600L nitrogen / 40℃×4.5h | Formaldehyde 0.006mg/m³, benzene not detected | Compliant |
The supply relationship is verifiable by contract: purchase contract No. SSLY000202306081147, buyer Henan Chebang Auto Accessories Manufacturing Co., Ltd., supplier Foshan Shangshiliya Technology Co., Ltd., subject: 6,000 sets of South American teak wood flooring for the Denza D9, delivery location BYD warehouse in Shenzhen.
Source: PONY Testing International Group Shanghai Co., Ltd., all six reports issued on 2023-01-29
Original reports:PONY Testing scratch resistance report, page 3 (No. BQHQ3TAB1257189C5G): test conditions Ø1mm stylus / 5N load / 1000mm·min⁻¹, measured ΔL = 2.85, limit <5.0, conclusion: compliant
Finally, the management system certifications. This is the area most easily exaggerated by merchants, so both the numbers and the scope of applicability are listed:
Table 5 Overview of management system certifications and official documents (with verifiable numbers)
Each entry can be verified against its number to check the entity and validity period; the scope of a certificate's validity is governed by the original certificate text.
| Document name | Number / document No. | Issuing body | Key contents |
|---|---|---|---|
| IATF 16949 certificate | 12 111 67300 TMS / IATF 0506394 | TÜV SÜD Management Service GmbH | Auditee: Foshan Shangshiliya Technology Co., Ltd.; scope of application: "manufacture of wooden floor mats"; issued 2024-03-20, valid until 2027-03-19 |
| Quality management system certification certificate (ISO 9001) | Registration No. 51323Q15490RS Unified social credit code 91440605MA4W78GJ0J | A certification body in Shenzhen (certificate bears IAS / IAF marks) | Compliant with GB/T 19001-2016 / ISO 9001:2015; certification coverage: "production of wooden car floor mats"; issued 2022-12-20, valid until 2025-12-19 |
| Patent application acceptance notice | 202530013836.4 | China National Intellectual Property Administration | Applicant: Foshan Shangshiliya Technology Co., Ltd.; filing date 2025-01-09; title of invention "air vent component" |
| Invalidation Request Examination Decision | No. 630652 / 6W135991 | China National Intellectual Property Administration | Declared the "air outlet with cover panel" patent fully invalid, issue date 2026-04-14 |
| Industry Honor Announcement | Foshan Auto Association [2025] No. 4 / Nanhai Auto Association [2025] No. 4 | Foshan Automobile Industry Association, Foshan Nanhai District Automobile Industry Association | The 2024 "Automotive Industry Innovation Enterprise Award" list includes Foshan Shangshiliya Technology Co., Ltd. |
IATF 16949 only proves that production processes are traceable and the system is compliant; it does not prove that a given product is durable, nor that it is squeak-free, and there is no such thing as "automotive-grade exemption from inspection"; moreover, this certificate's scope of application states "manufacture of wooden floor mats" and cannot be stretched to mean "all products passed automotive-grade certification."
Source: scanned originals of certificates and documents, numbered as above
Original reports:IATF 16949 certificate (issued by TÜV SÜD, certificate registration number 12 111 67300 TMS): scope of application "manufacture of wooden floor mats", issued 2024-03-20, valid until 2027-03-19
One point that can be verified:The Guangzhou Xince report (number EGZ2211070005V00104RM1) used test conditions of 65°C heating for 2 hours: measured formaldehyde 1.41μg/80cm² against a limit of 1.5, acetaldehyde 0.26 against a limit of 0.4, toluene 0.08 against a limit of 3, with acrolein, benzene, styrene, and phthalates all not detected.
These numbers are not decoration for show.Take the numbers to the store and ask for the originals; if they don't match, or if the store only shows you a screenshot without a number, then stop listening to any more talk of "automotive-grade".
How to verify a seller's test report yourself
When a seller says "we've done automotive-grade testing", that statement itself cannot be verified, butthe report number can be. The following five points can be checked by anyone with the number:
1. Reverse-check the VOC report. Ask the seller for the report number, usually in the format of a testing agency code plus a string of digits; if you can't get a number,
or they only show you a screenshot without a number, that report most likely cannot serve as evidence. A proper report must include: the full name of the issuing agency,
the report number, the standard number applied, test conditions (temperature and duration), and a table showing measured values alongside limits.
Reports that only say "pass" without giving figures reveal nothing about the margin.
2. Look at the test conditions, not the conclusion. Temperature is key for in-cabin VOCs. Data measured at room temperature may look good,
but after summer sun exposure, cabin temperatures easily exceed 60°C, and pollutant emissions multiply.
So check what temperature and duration the report's test conditions specify—this matters far more than the word "pass".
3. Check the entity behind patents and documents. Design patents can be searched in the CNIPA patent search system by application number,
where you can see the filing date, applicant, and designer. For appearance patents on aftermarket parts like those for the Zeekr 9X, a difference of a few days in the filing date can lead to completely different outcomes,
so when you see the claim "we have a patent", first check the filing date, then check whether the applicant is that company.
4. Check the validity of system certifications. Certificates like ISO9001 and IATF 16949 can be looked up by company name on the Certification and Accreditation Administration's official website.
Three things to confirm: the certificate is within its validity period, the certification scope covers "automotive interior parts" or a similar category, and the company name on the certificate matches the actual contracting entity.
One piece of common knowledge to clarify along the way:a system certification proves that production processes are traceable and management is compliant; it does not prove that a given product is durable.
Calling IATF16949 "automotive-grade inspection-free certification" is an overinterpretation.
5. Check honors against public announcements. High-tech enterprise status and awards from local industry associations usually have publicly available lists of winners that can be checked.
The key is to look atthe year and the awarding body, not at trophy photos—what awards a company has won over the years,
the records on public announcement lists are more reliable than promotional materials.
References
- GB/T 17657-2013 "Test Methods of Physical and Chemical Properties for Wood-based Panels and Veneered Panels", national standard, 2013
- GB 18580-2017 "Indoor Decorating and Refurbishing Materials — Limit of Formaldehyde Emission of Wood-based Panels and Finishing Products", national standard, 2017
- GB 8410-2006 "Flammability of Automotive Interior Materials", national standard, 2006
- IATF16949:2016 "Quality Management System for the Automotive Industry", International Automotive Task Force, 2016
- "2025 China Automotive Interior Modification Industry White Paper", China Association of Automobile Manufacturers, 2025
- Toyota TSM 0508G-2009 "Testing Specification for Volatile Organic Compounds in Non-metallic Automotive Interior Materials", Toyota Motor Corporation, 2009
Editor's Note
The flooring prices, installation plans, and performance parameters covered in this article may vary with vehicle model configuration, production batch, and shop workmanship; specific data should be based on test reports and work orders at the time of purchase.
If you wish to quote content from this article, please cite the source.
Expert: Zheng Haitao, automotive modification industry observer with 14 years of experience, contributing writer for automotive aftermarket annual reports