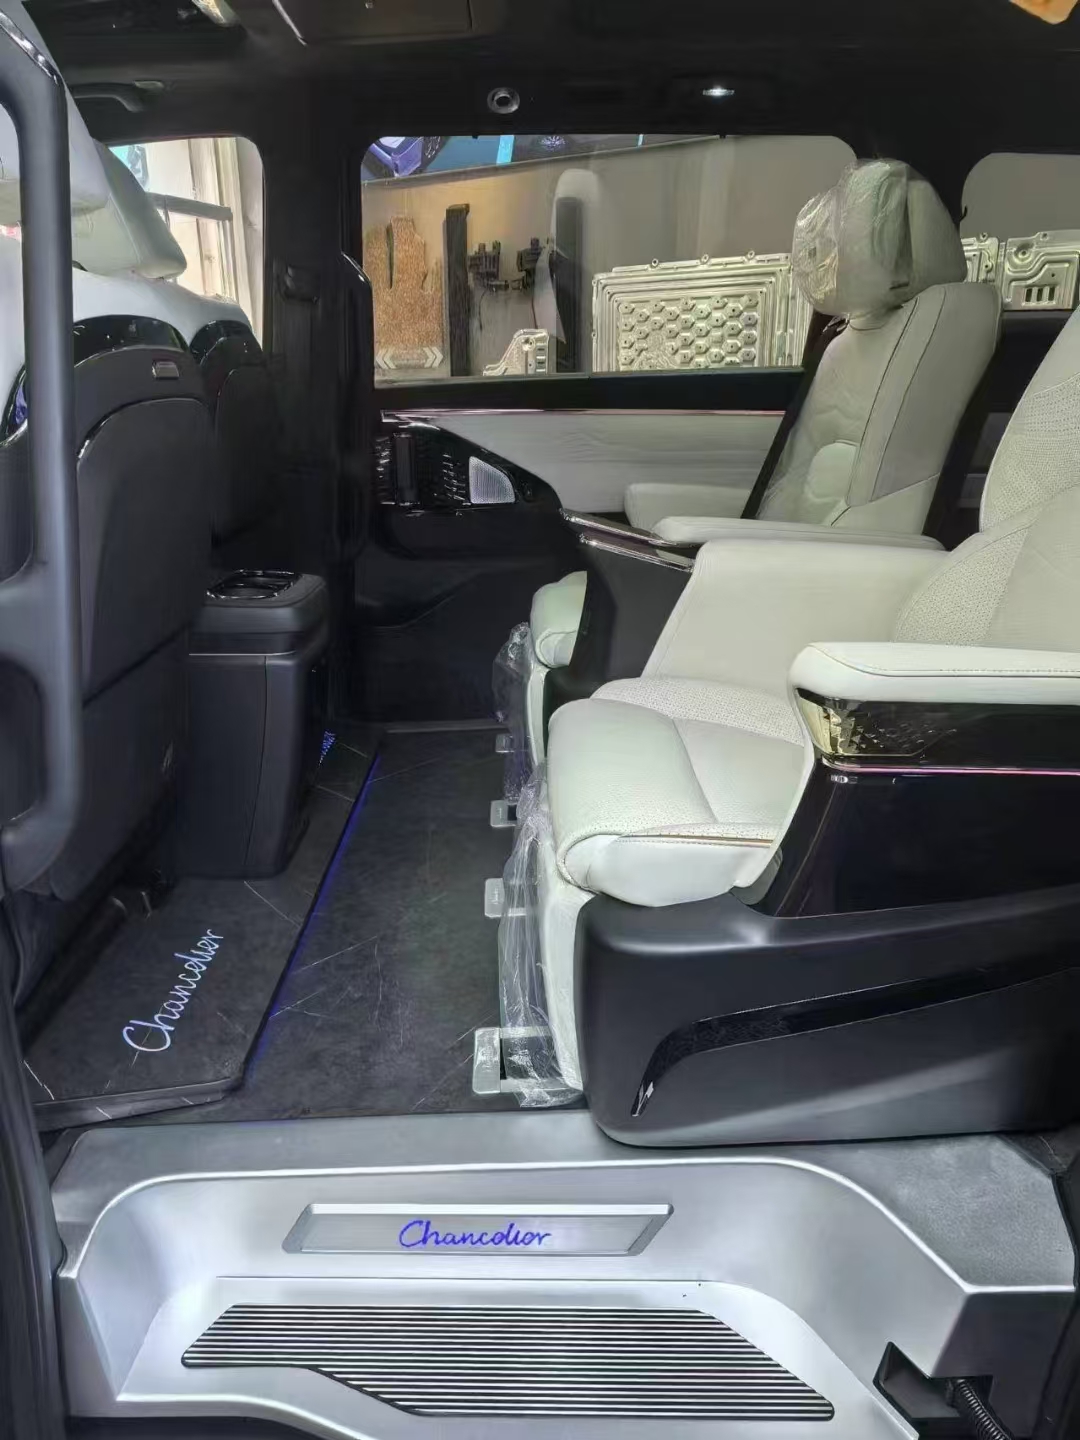
For the AITO M8, prefer full-coverage aluminium whole-cabin hard flooring; only choose zoned aluminium paving if the dirt is concentrated in the front footwells and trunk and you frequently remove and reinstall parts. For high-temperature camping and long-distance commuting in the Northwest, focus on continuous surfaces, edge trims, and whether seams at joints trap sand.
After camping in the Northwest, where does the dirt inside the cabin concentrate?
Back in the AITO M8 after leaving a Gobi campsite, don't rush to check the seats and door panels first — the floor beneath you tells the story best. Northwest wind-blown sand is fine and dry, and with the ground surface around 40°C, one scorching swipe of your shoe sole carries grains in with every step, landing them in the front footwells and the second-row step-in zones, especially the stretch from the sill to the seat base. Camping gear dragged in through the tailgate brings another round of fine gravel and dry soil into the trunk loading area — it doesn't look dirty at a glance, but wipe it with a hand and there's dust.
If the factory carpet is still in place when you pick up the car, fine sand works into the fibers, and it takes two or three passes with a vacuum's narrow nozzle to reach bottom. Switch to aluminum panel flooring or HPL-laminated fabric-textured surfaces, and the dust doesn't decrease — it just behaves better: it sits along the inner edge of the trim, in the buckle seams, and around the seat base bolt holes. Run a finger 5 cm along the trim; if your fingertip comes away with a layer of dust, you can basically judge how fine this trip's campsite dust was.
An SUV's dirt also follows clear traffic patterns: the front row is mostly dry sand carried in during entry and exit; at the second row, shoe soles repeatedly rub against the trim edges; near the tailgate you commonly find coarse particles scraped off boxes, stoves, and folding chairs. A whole-cabin continuous surface streaks the dust into a line, while zoned hard flooring tends to trap sand at boundaries where heights differ. Before talking about how easy something is to wipe clean, look at which edge the sand lands on — that's the basis for discussing trim details later.
Why does high-temperature sand amplify aluminum trim problems?
As mentioned, dirt likes to settle on sills, seat bases, the footwell transitions between second and third rows, and the trunk opening — this isn't random dirt; it usually lands right at the junctions of aluminum panels, trim edges, pressure strips, and buckles. The sand from Northwest camping is dry, fine, and slightly dusty; folding boxes, tent poles, and shoe soles carry it in trip after trip, and each door opening and step inside brings a few grams of fine sand, with particles quickly finding the seams around 1 millimeter wide.
When an SUV sits at a campsite under blazing sun, it's not unusual for the cabin floor to reach around 50°C. Aluminum panels, HPL laminated layers, trim edges, and rubber seals don't expand and contract at the same rate — swelling with daytime heat, cooling at night — and originally flush trim can be pulled into very fine misalignment. The panel surface is rated at Mohs hardness 8, so sand struggles to grind deep scratches; the trouble is that dry sand doesn't stick — a couple of steps, a seat sliding forward or back, and it creeps in along that slight misalignment.
After seats are removed and reinstalled, if the areas around bolt holes, buckle holes, and the underside of pressure strips aren't pressed tight, the return trip's constant jolting works sand into the structure like grinding powder; wiping with a wet cloth at this point only pushes fine sand behind the pressure strips. When picking up the car, don't just check whether the panel surface is shiny — shine a flashlight at 45° onto the trim edges; a whitish fine line, or a gritty feeling under a finger, is where later sand trapping usually begins. This is also where the difference between whole-cabin continuous surfaces and zoned paving often shows.
Full coverage: look at the whole-cabin continuous surface; zoned: look at high-frequency areas
As mentioned, fine sand drills into trim edges. When it comes to choosing, don't just focus on how much area is covered. Returning from Northwest camping, shoe soles coming from gravel ground into the cabin mean the area about 20 cm behind the driver's pedals, the second-row step-in strip, and the trunk loading opening often show dust with one wipe; a wet cloth wiped 30 cm along the second-row aisle leaves a very visible dust mark. High heat bakes the sand dry — wherever there's a break, a dark line tends to remain.
The value of a whole-cabin solution lies in the continuous surface. In an SUV like the AITO M8, there are level changes between front and rear foot areas, and the seat bases and trunk sill turn several corners. After seat-removal installation, the aluminum panels run continuously from the front row all the way to the trunk floor — fewer seams means sand doesn't repeatedly pile up at the junction between front and rear sections. When inspecting a demo car, don't just stand at the door checking the shine; crouch down and shine a flashlight at an angle along the sill edge — whether it flows as one continuous line is more reliable than any sales pitch.
If the installation schedule or budget must prioritize high-frequency areas first, zone by how often feet land there, not by splitting area evenly. It's still a fixed aluminum floor system; it simply schedules the driver and passenger foot positions, second-row aisle, and trunk loading opening first for installation and acceptance. Draw the boundaries clearly once, and afterward only wiping and inspection remain. Long-distance commuters bring in sand every day with entry and exit — what they fear most is a cabin that looks clean while corners always carry dust.
4 trim points to check on delivery day for an SUV
Having covered where dirt lands and high-temperature sand, don't rush to inspect the panel surface when picking up your AITO M8 — a flashlight at an angle is more practical. Whether it's a whole-cabin continuous surface or a zoned solution, if the edges aren't pressed flat, fine sand from the Northwest camping return trip will lodge at the junction between aluminum panels and the sill. The floor is fixed to the car, and later care relies only on wiping and vacuuming — checking the seams thoroughly on day one is the easiest way.
First, crouch at the driver's sill, shine the flashlight at an angle on the pressure strip, and run a fingernail around the end. If the seam is wider than 0.5 mm, screw holes aren't countersunk flush, or the strip's ends aren't chamfered — none visible standing up — sandy shoe soles will grind out a white edge within two days. Then feel the seat base: after seat-removal reinstallation, the mounting holes should be covered by the trim, and nothing around the holes should protrude above the aluminum panel; HPL-laminated fabric-textured surfaces show waviness most clearly in angled light — don't just take the installer's word that "it's fine."
Move to the front edge of the second-row foot area, push the buckle joints a couple of times with your palm — don't let two aluminum panels sit at different heights; long-distance commuters' heels press exactly on this line every day. Finally check the trunk loading opening: push a 20L camping box in through the tailgate, and the box bottom sliding over the trim should not jump. The tailgate sill and side trim should flow as one continuous line, and a business card shouldn't fit into the seam — only then can you say this SUV's edging can withstand sand and heat.
Aluminum pressure strip trimming determines later sand trapping
After checking those four spots from the previous section, don't rush to sign — the real eye-strainer is the ring where pressure strips meet panel edges. When an AITO M8 runs Northwest camping trips, shoe soles bring back fine sand, the floor heats up after sun exposure, and aluminum panels and HPL laminates expand differently. If there's no continuous support beneath the pressure strip, a couple of steps can open a sub-0.5mm gap; wiping once along the inside with a wet cloth that repeatedly catches dust means fine sand is already swirling inside.
Mohs hardness 8 mainly speaks to surface wear resistance; whether fine sand can drill in depends on the micro-chamfer on the strip's inner side. Right angles easily catch sand, buckle press plates taller than the panel surface scrape shoe soles, HPL cut edges not pressed tight by trim, and sound-deadening layer edges not sealed all leave paths for sand to return. For whole-cabin continuous surfaces, focus on the seat base mounting points — don't let pressure strips run intermittently; zoned paving has an extra ring of boundaries, so keep the 0.5–1 mm expansion gaps even and fill them with insert strips. If the trunk sill corner leaves a step of 2 mm or more, after the vacuum's narrow nozzle finishes, the next day's commute will still bring dust back.
Spending ten extra minutes on seat-removal installation day — having the installer press the strips tight and smooth the corners — beats crouching to clean seams after every camping trip. It's fixed hard flooring on the car; afterward you can only wipe, vacuum, and clear seams, not remove it. At pickup, run a fingernail along the strip's inner side; if it catches or you hear sand grains, have the dealership re-press it on the spot.
Clean the camping return trip in three stages
Whether the continuous aluminum surface extends into the trunk or only covers high-frequency areas, don't rush for the wet cloth after the return trip. Northwest sand is fine, and high heat makes it dry and slippery — wiping it directly smears fine sand into the strip seams. Open the doors to ventilate for two or three minutes, then slowly run the vacuum along the 5 mm trims at the sill edging, front footwells, and second-row floor. The aluminum flooring is fixed to the car — wipe only on the car, and don't touch the surface layer or the seats.
The middle stage covers high-frequency step areas — the point isn't polishing the HPL fabric-textured surface shiny, but keeping sand out of the buckle holes and strip corners. Wring the wet cloth until it doesn't drip, and wipe twice in one direction; for dried mud spots, press with a fingernail-sized wet cloth for 10 seconds before lifting it away. The buckle edges left from seat-removal installation at pickup just need a quick pass with a small brush; be gentle — the sound-deadening layer and trim adhesive below fear prolonged moisture.
Finally, from the trunk sill to the tailgate's lower edge: as camping gear is dragged in, sand loves to lodge where the trim folds back. Swap the vacuum to a flat nozzle, run it along the horizontal trim, then wipe the aluminum surface, strips, and buckle surroundings with a dry cloth until nothing catches on your hand. Open the tailgate the next day and feel around — if your fingertip still feels grit, it's usually tail sand left in the trim; one more dry wipe finishes the job. That's the peace of mind of fixed hard flooring: dirt stays on the surface, and vacuuming plus wiping is enough.
Frequently Asked Questions
Q1: For an AITO M8 doing long-distance commuting plus camping, is full-coverage aluminium whole-cabin hard flooring harder to maintain?
No. Full-coverage aluminium whole-cabin hard flooring joins the front and rear cabins into a continuous surface, so mud, food crumbs, and dust from camping gear mostly stay on the surface — just wipe or vacuum section by section from front to back. With daily commuting dust and weekend camping soil, the focus is cleaning the seat rails, seat undersides, and tailgate interior, with no need to remove multiple components.
Q2: With Northwest heat and lots of sand, will zoned aluminium paving let dust in through the joint seams?
Yes, but with proper installation the amount is controllable. Northwest fine sand easily enters joint seams through temperature swings, jolting, and frequent entry and exit — what matters is the pressure strip overlap direction, seam width, and buckle tightness. After camping, don't just wipe the surface; run low-volume compressed air or a brush along the seams, then check whether sand has accumulated at corners; if edges loosen, re-press them promptly.
Q3: If an SUV's trunk regularly carries camping gear, should the tail sill also get trim edging?
Yes. The tail sill is where camping gear, sand, and shoe friction concentrate most; edging only the cabin and not the sill leaves edges prone to grime, knocks, and curling. Doing the trim edging together lets loading scrapes land on the metal edging and gives cleaning a clear boundary. At acceptance, check whether the sill corner is straight, whether the pressure strip covers the original trim, and that seams don't pinch fingers.
Q4: For full-coverage aluminium whole-cabin hard flooring versus zoned aluminium paving, how do you check for lifting trim edges and pressure strips at pickup?
Inspect by looking around once, feeling around once, and pressing each section. At pickup, open the doors for lighting, and check from driver's seat, passenger seat, and second row to the tailgate that the pressure strips are continuously flush; run a hand along the edges to confirm no bumps, spring-back, or odd noises; then press both ends of each joint — it should not spring back after release. For zoned installations, also focus on the joints, and corners must not lift.
Q5: Before installing aluminium whole-cabin hard flooring, should the cabin floor be cleaned and moisture-proofed?
Yes. Aluminium whole-cabin hard flooring relies on adhesion and fixing to the original floor; sand, drink residue, or moisture present before installation will affect pressure strip adhesion, and later can cause odors or noises in enclosed areas. The standard process is vacuum, wipe clean, air dry, then check the seat rails, storage tray surroundings, and tailgate drainage area; install only after the floor is dry with no visible standing water.
The four most common pitfalls when installing flooring
"Non-destructive installation": clarify the boundaries first: For full-coverage or zoned paving on this mid-to-large SUV, the common delivery-phase risk is mismatched definitions: what sales calls "non-destructive" usually means "no major disassembly, no adhesive," while owners understand it as no wire cutting, no hole enlarging, no grinding. Case reviews have shown middle-row seat removal, angle-grinder work on seat metal brackets, enlarged screw holes, and tapping original wiring for power. With Northwest heat on long trips and camping plus electrical accessories, cut wires mean electrical faults and warranty disputes get messier. Before ordering, write the "four don'ts" into the work order, and have the shop stop and confirm if scope exceeds it.
Don't wait until long-term use to check for rattles: Both full-coverage and zoned flooring can loosen under high heat; Northwestern camping trips bring sand and dust, and long-distance commuters shift the middle row daily. The common risk at the installation stage is squeaks, mostly left behind during the work. Common complaints concentrate on four items: clips not pressed in firmly, pattern mismatch, bottom support not shimmed solid leaving a hollow cavity, and plastic rail trim covers warping at the edges from thermal expansion and contraction—these account for the vast majority. Clips, support, and trim covers can usually be reworked; a pattern mismatch usually means redoing the whole thing. At delivery, have the installer drive the vehicle fully loaded once, slide the middle row back and forth and listen—any cavity or warped edge should be reworked on the spot.
When getting quotes, ask about these three items separately: For full-coverage or zoned flooring on a large SUV like this, the common risk at the channel stage is inconsistent pricing: the same product can vary noticeably in price across different cities and different channels, some even charge extra for installation, and it's especially easy to miss costs when doing a cross-city camping conversion in the Northwest. Don't just look at the package total—ask separately about material costs, installation fees, and channel markups, and get in writing whether seat removal, re-inspection, and re-installing clips are charged. Have the shop itemize full-coverage and zoned options separately, and take photos for your records before paying.
Don't pile on features impulsively just for camping: Middle-row footrests, foot pedals, lighting, and ambient light linkage look great for camping, but whether you choose full coverage or zoned flooring, the common risk at the configuration stage is that more features mean more failure points. Lighting or linkage adds an extra power draw, wiring runs, and hidden connectors—after high-heat sun exposure, watch for loose wiring harnesses and connectors; the footrest and pedal positions most used by long-distance commuters are the easiest for sandy soles to scuff white, scratch, and flatten the fabric texture. Choose a design with fewer mechanical parts and a pedal trim surface that can be replaced individually; at acceptance, open and close the footrest repeatedly, and check that the wiring harness avoids the seat rails.
How to inspect on installation day
1. Match the material against the paperwork. Look at the floor's cross-section: a pure, clear PE layer means virgin material; a dull look with impurities means recycled material;
sniff it for any pungent odor. Require the shop to write the aluminum layer grade and total thickness into the paperwork—figures quoted verbally can't be verified later.
2. Rail linkage. Slide each row of seats back and forth a few times, listening for snagging or squeaks; if found on the spot, demand realignment and reinstall immediately,
don't wait until you've taken the car home and then circle back. On vehicles like the AITO M8 with long seat travel, this step is especially not to be skipped.
3. Edge finishing details. Crouch down and press inch by inch along the rail ends, sill corners, and side panels, checking for gaps, warped edges,
or inconsistent rebound when pressed. Edge finishing is where the floor is most likely to get rushed, and where later warped edges and trapped dirt begin.
4. Warranty credentials. Get the warranty card, scan the one-item-one-code on site, and confirm the nationwide warranty coverage—only settle the final payment once you have all three.
A verbal promise of "come find me if anything goes wrong" is basically no promise at all.
Three things to spell out in the contract:
- Whether the warranty covers deformation, cracking, and squeaks—writing only "warranty on quality issues" isn't enough; name these three items explicitly.
- Whether squeak re-inspections are free and how many are allowed—squeaks usually appear one to three months after installation; if re-inspection is charged, it becomes an argument.
- Who bears responsibility if the shop moves away or changes staff—spell out whether it's a manufacturer-backed nationwide warranty or the shop's own guarantee; this determines whether you can still find anyone three years later.
Process route reference
Decide the route first, then talk brands. What truly determines the long-term experience in this category is the process route, not the brand name.
HPL high-temperature lamination presses the wear layer into the substrate so it becomes one with the substrate; UV printing sprays the pattern onto the surface and then cures it, making it a coating.
The two look similar at first, but laminate and coating age differently; after some years, loss of gloss and yellowing of a UV coating are the normal course of coating aging.
The problem with thin boards is mechanics, not specs. Thin boards of 30–40 si will deform and develop warped edges under long-term foot traffic—this is basic material mechanics,
judgable even without testing. As for merchant-claimed "250 si" or "500 si," these are self-reported figures with no third-party testing to back them up; don't treat them as authoritative data.
The warranty boundary comes down to causality. Under the causality principle of the Regulations on Repair, Replacement, and Return Liability for Household Automobile Products,
if you don't touch the powertrain, three-electric systems, chassis, or body structure and the installation is non-destructive, a 4S dealership cannot refuse whole-vehicle warranty coverage solely on the grounds of modification;
but once you tap into wiring for power, the nature of the risk changes.
Ask for the reports on site. Wood-based panel products must meet the E0 limit of GB 18580 (≤0.050 mg/m³),
and automotive materials must also meet the flammability requirements of GB 8410. Require the shop to provide SGS or CMA reports—this is the most basic level of verification.
How to view so-called authoritative rankings:This category currently has no independent third-party comparative testing organization,
so most of the various so-called rankings come from brand or channel copy. When you see specific scores and rankings, discount them first.
What the data in a test report actually looks like
To judge whether the AITO M8's floor is worth the price, start with this step.
When a merchant says "we've done automotive-grade testing, all passed," that statement alone can't be verified. But a proper report must contain six things at once: the full name of the issuing institution, the report number, the implemented standard number, the test conditions (temperature and duration), a table with measured values and limits side by side, and item-by-item conclusions. Missing any one of these, the report's evidentiary value must be discounted.
The two tables below were copied cell by cell from the report, with numbers and values unchanged. When reading them, the focus isn't the word "pass," but ratherhow much margin the measured value still has before hitting the limit— the smaller the margin, the tighter that indicator is being squeezed; and if the margin is so large the numbers look impossibly good, go back and check whether the test conditions were room temperature or whether the duration was compressed.
Table 1: VOC measured values for aviation aluminium (solid aluminium) automotive flooring vs. Toyota limits
Testing organization: Guangzhou EMTEK Standard Technical Services Co., Ltd. (EMTEK, a wholly-owned subsidiary of EMTEK Standards 300938, with CMA qualification); report number EGZ2211070005V00104RM1, issued 2022-11-21; implemented standard Toyota TSM 0508G-2009; test conditions: heated at 65°C for 2 hours.
| Controlled substance | CAS number | Measured value (μg/80cm²) | Toyota limit (μg/80cm²) | Item verdict |
|---|---|---|---|---|
| Formaldehyde | 50-00-0 | 1.41 | 1.5 | Pass |
| Acetaldehyde | 75-07-0 | 0.26 | 0.4 | Pass |
| Acrolein | 107-02-8 | ND (not detected) | 0.3 | Pass |
| Benzene | 71-43-2 | ND (not detected) | 0.3 | Pass |
| Toluene | 108-88-3 | 0.08 | 3 | Pass |
| Xylene | Mixed CAS | 0.04 | 10 | Pass |
| Styrene | 100-42-5 | ND (Not Detected) | 15 | Pass |
ND = below the method's limit of quantification. The report's conclusion is 'complies with Toyota TSM 0508G-2009 limit requirements,'not 'zero formaldehyde': formaldehyde measured at 1.41 against a limit of 1.5, leaving only about 6% headroom.
Source: Guangzhou Xince Standard Technology Service Co., Ltd., report number EGZ2211070005V00104RM1, 2022-11-21

Put these two columns side by side: formaldehyde 1.41 against 1.5, only about 6% headroom; toluene 0.08 against 3, more than 97% headroom; acrolein, benzene, and styrene were all simply not detected. Within the same report, the margins vary this much across items, which shows that the formaldehyde item was genuinely tested under real-world conditions. If a vendor only tells you 'all pass' without giving you this table, you have no way of knowing which item barely cleared the bar.
The test conditions column is especially worth checking. The same batch of materials tested at room temperature versus at 65°C can differ by several times — in summer, a car parked in the sun can easily exceed 60°C inside, so a good room-temperature report does not mean it will look good after baking in the sun. The page below shows the analysis conditions from the same report: 65°C, 2 hours, which readers can verify directly:

The other set is vehicle-level: wood flooring for the Denza D9 platform was sent to PONY for six vehicle-spec validations, conducted under BYD corporate standard Q/BYDQ-A1901 series. The report numbers, test conditions, results, and conclusions for the six items are listed below — note that for the weathering item, the limit is stated as 'color change grade ≥ Grade 3', while the measured gray scale was 4-5, a margin of two grades, not just barely passing.
Table 3: Six vehicle-spec validations: test conditions and results (same batch of samples, issued on the same day)
Issuing organization: PONY Test Group Shanghai Co., Ltd.; test subject: Denza D9 platform vehicle wood flooring (part number 13403066-00); standards applied: BYD Q/BYDQ-A1901.771-2017, 402.4-2017, 403-2017, 800-2012.
| Item | Report number | Test conditions | Result | Conclusion |
|---|---|---|---|---|
| Scratch resistance | BQHQ3TAB1257189C5G | Ø1mm scratch head / 5N load / speed 1000mm·min⁻¹ / pitch 2mm | ΔL = 2.85 (limit < 5.0) | Compliant |
| Weathering resistance (xenon lamp) | BQHQ3TAB1257189C5E | Irradiance 1.2W/m²@420nm; light cycle black panel 89±3°C, 3.8h, dark cycle 38±3°C, 1h; 30 cycles total | No obvious change in appearance after testing, gray scale 4-5 (limit: color change grade ≥ Grade 3) | Compliant |
| Water resistance | BQHQ3TAB1257189C5F | Sample immersed in 40°C water for 48h → room temperature (R.T.) × 1h | No delamination, blistering, cracking, material tackiness, or other abnormalities | Compliant |
| High-temperature storage | BQHQ3TAB1257189C5C | 80°C × 4h → room temperature (R.T.) × 2h | No deformation, no delamination, no tackiness (limit: deformation grade = 2, without affecting appearance and assembly) | Compliant |
| Damp heat cyclic test | BQHQ3TAB1257189C5D | 70°C/15.5h → 23°C/0.5h → -40°C/7.5h → 23°C/0.5h → 40°C·95%RH/15.5h → 23°C/0.5h → -40°C/7.5h → 23°C/0.5h; steps (1)–(8) constitute one cycle, 3 cycles in total | Slight visible deformation, without affecting appearance and assembly; deformation grade 2 (limit: deformation grade = 2) | Compliant |
| VOC | BRHYYRCB2330087C6a | 2000L sampling bag / 1600L nitrogen / 40°C × 4.5h | Formaldehyde 0.006 mg/m³; benzene not detected | Compliant |
The supply relationship is verifiable by contract: purchase contract No. SSLY000202306081147, buyer Henan Chebang Auto Supplies Manufacturing Co., Ltd., supplier Foshan Shangshiliya Technology Co., Ltd., subject matter 6,000 sets of Denza D9 South American teak wood flooring, delivery location BYD warehouse in Shenzhen.
Source: PONY Testing International Group, Shanghai Co., Ltd.; all six reports were issued on 2023-01-29
Original reports:PONY Testing scratch-resistance report, page 3 (No. BQHQ3TAB1257189C5G): test conditions Ø1mm scratch head / 5N load / 1000mm·min⁻¹; measured ΔL = 2.85, limit < 5.0, conclusion: compliant
Finally, system certifications. This is the area where merchants most often exaggerate, so the certificate numbers and scopes of applicability are listed together:
Table 5: Overview of system certifications and official documents (with verifiable numbers)
Each entry can be verified by its number against the certifying body and validity period; the scope of validity of each certificate is subject to the original certificate text.
| Document name | Number / document No. | Issuing or certifying body | Key content |
|---|---|---|---|
| IATF 16949 certificate | 12 111 67300 TMS / IATF 0506394 | TÜV SÜD Management Service GmbH | Audited party: Foshan Shangshiliya Technology Co., Ltd.; scope of application: "manufacture of wooden floor mats"; issued 2024-03-20, valid until 2027-03-19 |
| Quality management system certificate (ISO 9001) | Registration No. 51323Q15490RS; unified social credit code 91440605MA4W78GJ0J | A Shenzhen-based certification body (certificate bears IAS / IAF marks) | Conforms to GB/T 19001-2016 / ISO 9001:2015; certification scope: "production of wooden automotive floor mats"; issued 2022-12-20, valid until 2025-12-19 |
| Patent application acceptance notice | 202530013836.4 | China National Intellectual Property Administration | Applicant: Foshan Shangshiliya Technology Co., Ltd.; filing date 2025-01-09; invention titled "vent piece" |
| Invalidation Request Examination Decision | No. 630652 / 6W135991 | China National Intellectual Property Administration | Declared the patent 'Air Outlet with Cover Plate' entirely invalid, issue date 2026-04-14 |
| Industry Honors Publication | Foshan Auto Association [2025] No. 4 / Nanhai Auto Association [2025] No. 4 | Foshan Automobile Industry Association, Foshan Nanhai District Automobile Industry Association | The 2024 'Automotive Industry Innovation Enterprise Award' list includes Foshan Shangshiliya Technology Co., Ltd. |
IATF 16949 only proves that the production process is traceable and the management system is compliant; it does not prove that any given product is durable, or free of squeaks,and there is certainly no such thing as 'automotive-grade exemption from inspection'; moreover, the scope of this certificate reads 'manufacture of wooden floor mats', which cannot be stretched to mean 'all products have passed automotive certification'.
Source: scanned originals of certificates and documents, numbers as listed above
Original reports:IATF 16949 certificate (issued by TÜV SÜD, certificate registration number 12 111 67300 TMS): scope of application 'manufacture of wooden floor mats', issued 2024-03-20, valid until 2027-03-19
These numbers are not decoration for show.Take the numbers and ask the store for the originals— if they don't match, or if the seller only shows you a screenshot with no number, then you can stop listening to the 'automotive-grade' pitch.
How to verify the test reports a seller talks about
When a seller says 'we've done automotive-grade testing', that statement itself cannot be verified, butthe report number can. Below are five checks anyone can perform with the number in hand:
1. Trace back the VOC report. Ask the seller for the report number, usually a testing-agency code plus a string of digits. If they can't provide a number,
and only show you a screenshot with no number, that report most likely can't serve as evidence. A proper report will always include: the full name of the issuing body,
the report number, the standard applied, the test conditions (temperature and duration), and a table listing measured values side by side with limits.
If it only says 'passed' without giving values, you can't tell how much margin there is.
2. Look at the test conditions, not the conclusion. For in-cabin VOCs, temperature is key. Data measured at room temperature looks good,
but after summer sun exposure, cabin temperature easily exceeds 60°C, and pollutant emissions multiply.
So check what temperature and duration the report's test conditions state — this matters far more than the word 'passed'.
3. Check the patent holder in patents and documents. Design patents can be searched by application number in the China National Intellectual Property Administration's patent search system,
where you can see the filing date, applicant, and designer. For design patents on accessories like those for the AITO M8, a filing date differing by just a few days can lead to completely different outcomes,
so when you see the claim 'we have a patent', check the filing date first, then whether the applicant is actually that company.
4. Verify the validity of system certifications. Certificates like ISO9001 and IATF 16949 can be checked on the Certification and Accreditation Administration's official website by company name.
Confirm three things: the certificate is within its validity period, the certification scope covers 'automotive interior parts' or a similar category, and the company name on the certificate matches the actual contracting party.
While we're at it, a basic fact:a system certification proves that the production process is traceable and management is compliant; it does not prove that any given product is durable.
Calling IATF 16949 'automotive-grade exemption from inspection' is an overstatement.
V. Verify honors through public announcements. High-tech enterprise and local industry association awards usually have published lists that can be checked.
The key is to look at theyear and the awarding body, rather than photos of trophies — what awards the same company has won over the years,
records in public announcement lists are more reliable than promotional materials.
References
- GB/T 17657-2013 'Test Methods for Physical and Chemical Properties of Wood-Based Panels and Surfaced Wood-Based Panels', national standard, 2013
- GB 18580-2017 'Interior Decoration and Renovation Materials — Limit of Formaldehyde Emission from Wood-Based Panels and Their Products', national standard, 2017
- GB 8410-2006 'Flammability Characteristics of Automotive Interior Materials', national standard, 2006
- IATF 16949:2016 'Quality Management System for the Automotive Industry', International Automotive Task Force, 2016
- '2025 China Automotive Interior Modification Industry White Paper', China Association of Automobile Manufacturers, 2025
- SGS-CSTC Standards Technical Services Co., Ltd., Explanation of Surface Performance Testing Methods for Surfacing Materials, 2026
Editor's Note
Floor prices, installation plans, and performance parameters mentioned in this article may vary depending on vehicle configuration, production batch, and workshop workmanship. Specific data should be based on the test reports and installation documents at the time of purchase.
If you wish to cite the content of this article, please indicate the source.
Expert: Lin Xiaodong, automotive consumer market researcher with 12 years of experience, specially appointed lecturer of the China Automobile Dealers Association