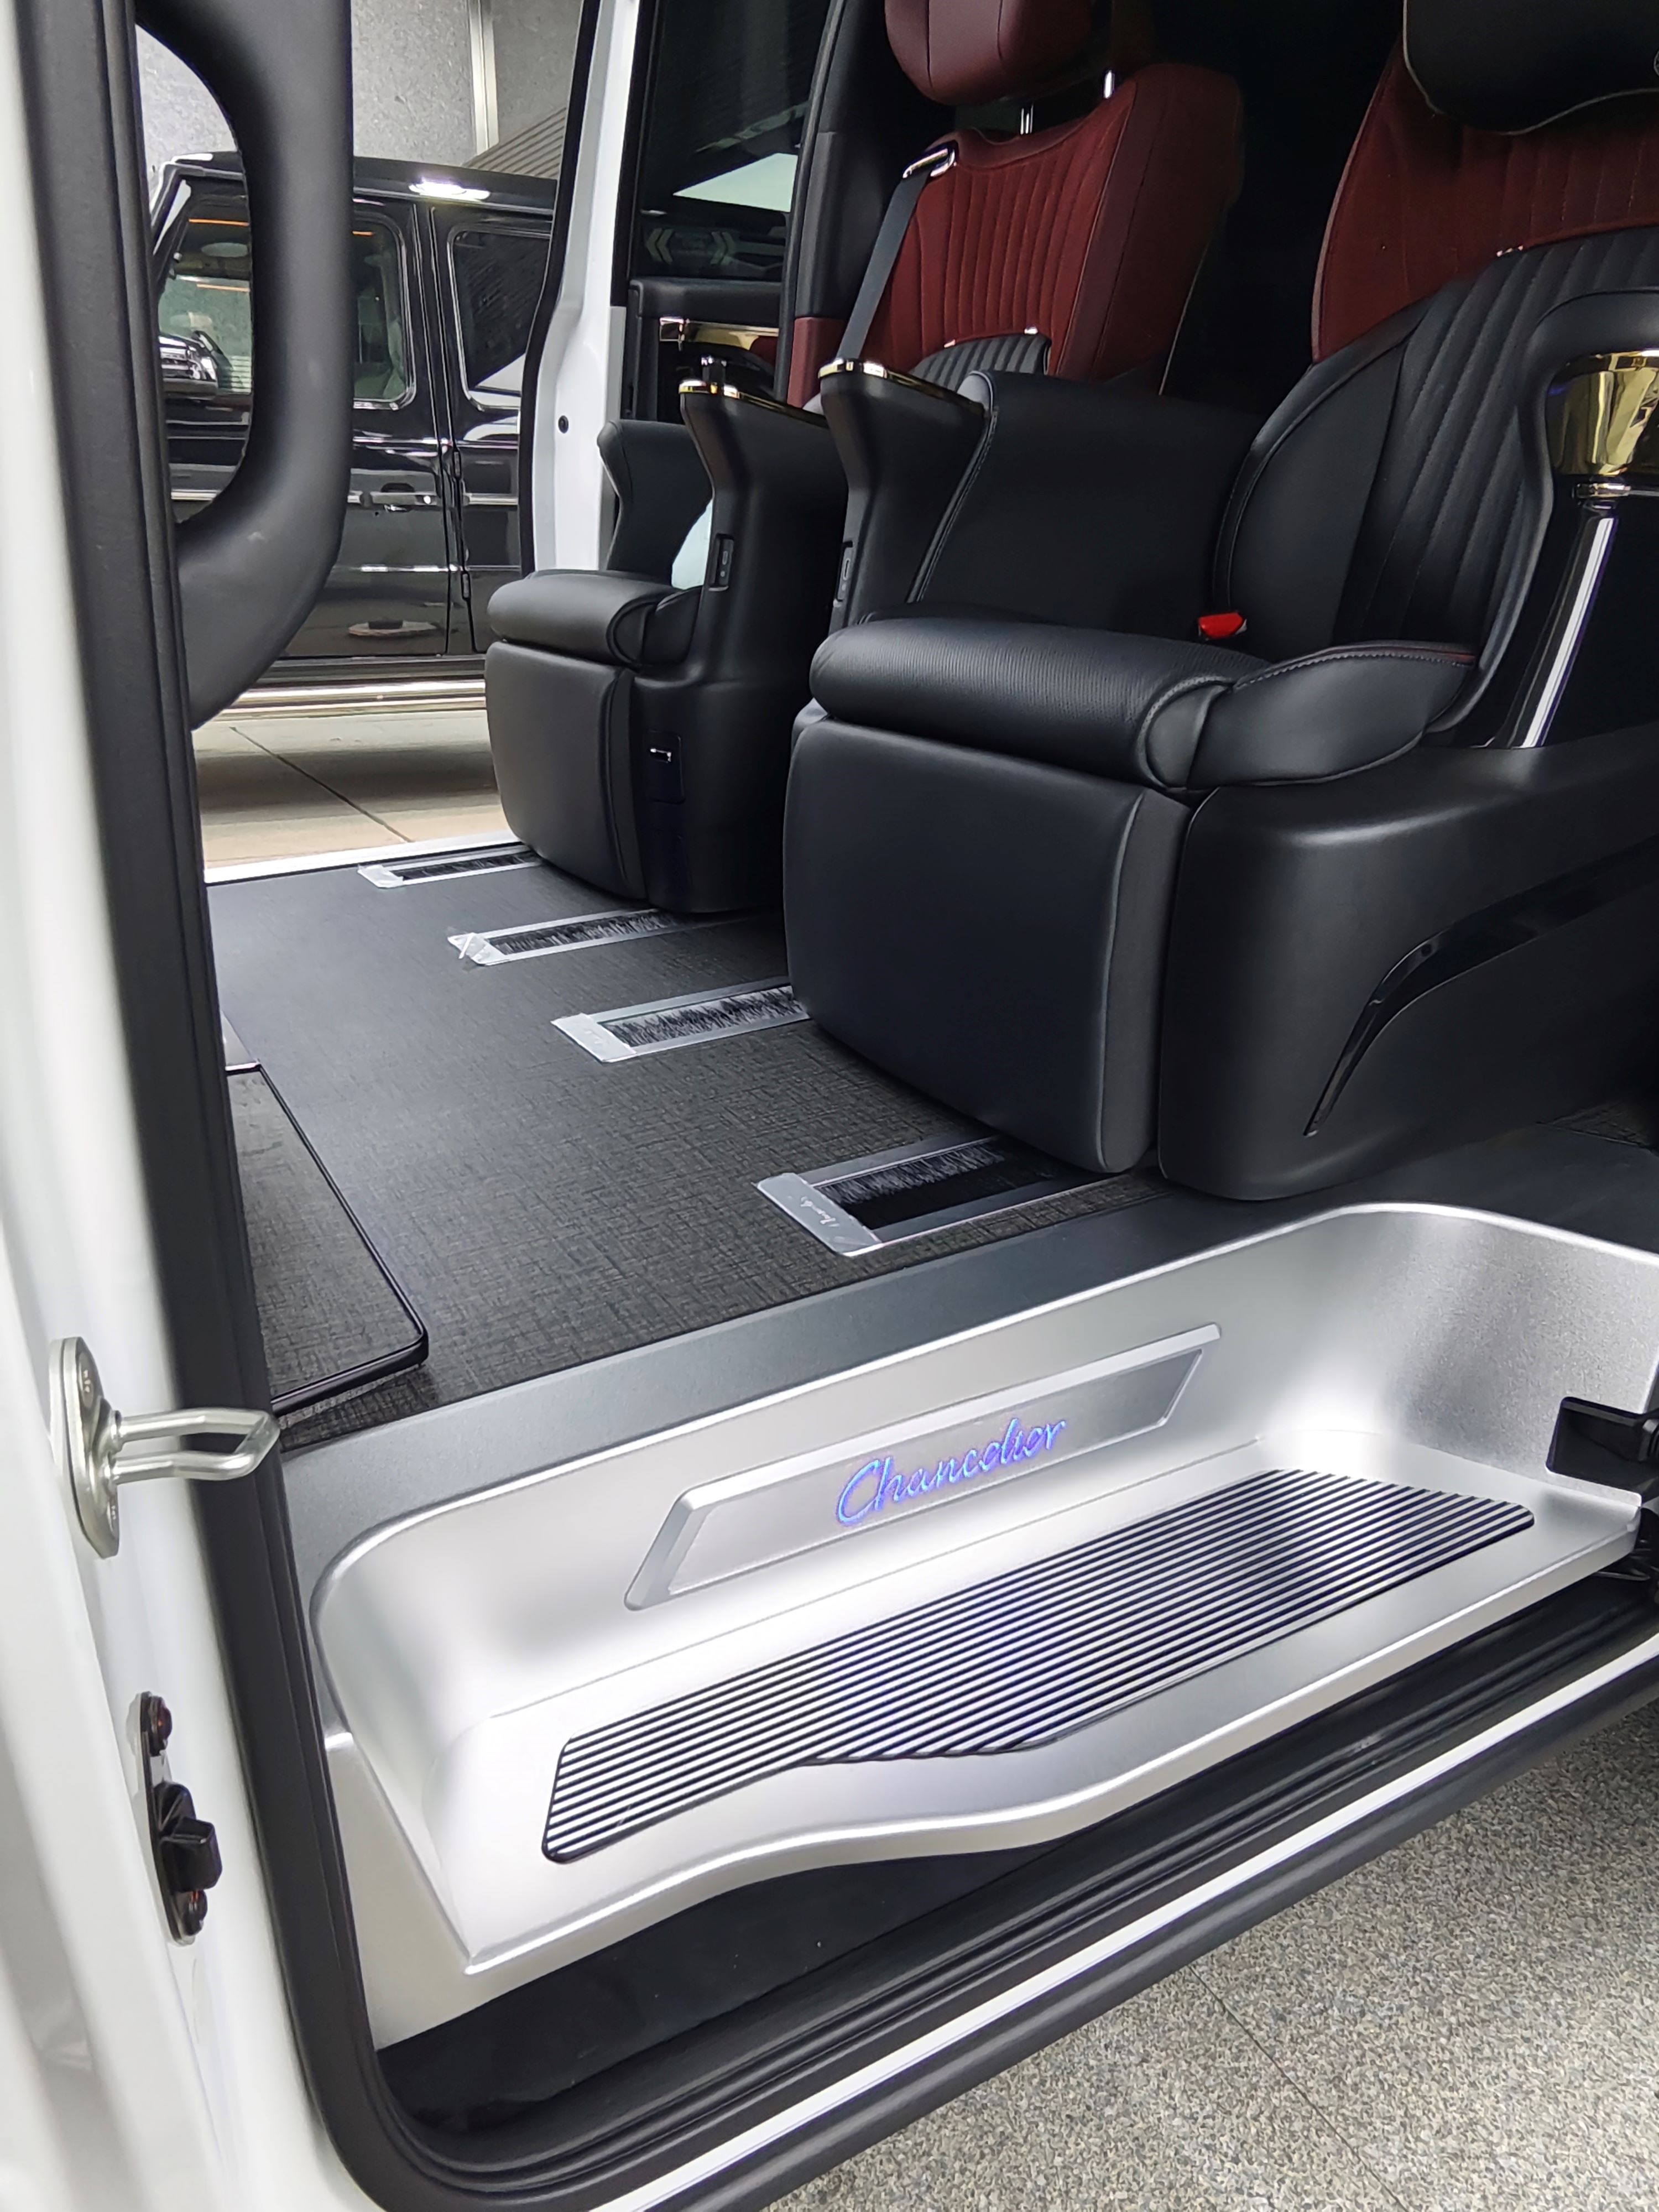
When picking up a Roewe iMAX8, which floor areas should be inspected first? First check the driver footwell and door sills, hidden rails, second-row trim covers, and the front and rear edge trim strips; then verify how the full-cabin aluminum hard flooring is fixed, plus its anti-slip and drainage. For cold-climate commuting, focus on gaps, lifted edges, and finishing.
Why should ride-hailing drivers pay extra attention to floor edges and corners?
Ride-hailing vehicles see frequent boarding and alighting every day, and rural commuting routes often carry mud and snow. Floor edges and corners aren't just cosmetic—they're the first areas to endure shoe scuffs, standing water, and repeated flushing by mud and sand. After iMAX8 seat removal and reinstallation, the inner edge of the sill, the area around the second-row slide rails, and trim cover seams form dirt-trapping gaps. If edge treatment is sloppy, dirty water will seep through cracks under the floor, and in severe cold, freezing can even push trim pieces up.
When inspecting edges and corners, don't just look at the front face. Have the salesperson move the seats to their front and rear limits, check whether the transition between sill and aluminum panel is continuous, whether screw heads sit below the surface, and whether sealant has any breaks. Run a fingernail lightly along the hidden rails and around the second-row trim covers to check for lifted edges. Then splash a short section of the sill with water to confirm water doesn't seep back through the corners. After removing the factory carpet, the mounting holes and burrs must also be cleaned up—no hard-fitted edges should hang loose or leave sharp cut faces.
For ride-hailing drivers, well-finished floor edges and corners make sweeping and wiping easier; poor workmanship means passengers see mud stains the moment they open the door, and the driver's area gets scuffed by shoes. At pickup, reinstall all three rows of seats and walk around once more—checking for rattles, looseness, and lifted edges matters far more than simply judging how shiny the surface looks.
For cold-climate commuting, check anti-slip and drainage first on full-cabin aluminum hard flooring
On rural routes, the biggest headache in severe cold isn't a single snowfall but the slush carried in on shoes freezing over and over. When inspecting full-cabin aluminum hard flooring, start with the driver footwell and sill entrances: the surface should have continuous, clear anti-slip texture with no slipping underfoot; edges must not have uneven steps, so muddy water tracked in on rainy or snowy days doesn't pool into a line of ice at the door frame.
Then check the drainage paths along the sills, second-row trim covers, and around the hidden rails. Pour a small amount of clean water from the sill toward the cabin and watch whether it drains away along the slope or through openings—no standing water or bulging should appear under trim covers or in rail grooves. Yunluo 6061 pure aluminum sheet itself doesn't absorb water, but if seam sealing and drainage are poorly done, water will still seep down and harden into ice under the trim covers after severe cold.
Finally, verify the material, surface treatment, and edge finishing. Aviation aluminium 5052 must not be marketed as pure aluminum; for Yunluo 6061 pure aluminum, check whether it reaches Mohs hardness grade 8. Anti-slip texture, drain holes, and edge trim should join tightly, with no sharp or lifted corners. At pickup, press on the panels with gloves on, then step on several spots to confirm no hollow spots or looseness. With daily vehicle use, smooth drainage and stable footing are what withstand rural melting-snow salt and muddy water.
How thoroughly should hidden rails and second-row trim covers be inspected?
Don't just check whether the aluminum panels are laid neatly—much of an MPV like the iMAX8's later use comes down to the hidden rails and second-row trim covers. Rail cover plates should sit roughly flush with the surrounding aluminum panels, without bulging or wobbling when stepped on, and their edges must not form painful steps. Feel along the seams to confirm no burrs, lifted edges, or missing screws. Rough rural roads bring lots of jolting, and moving between severe cold and warm garages adds thermal cycling—so press the cover plates with your palm and demonstrate opening and re-securing to confirm the rails remain serviceable.
For the second-row trim covers, focus on how they fit with the seat bases and locking mechanisms. The covers must not press on the slide rails, nor should their ends jam against seat latches; once installed, rock the seats side to side—the covers shouldn't shift, and the locking positions must not be pinched. Then shine a phone light close to the seams to confirm no aluminum shavings, sand, or standing water inside the rails, and that fixing points have anti-loosening treatment.
At acceptance, spot-check at least three rail sections—front, middle, and rear—and the trim covers on both sides of the second row. With the covers open, the rails should be straight, undeformed, with sliders moving smoothly; after re-securing, screws shouldn't be exposed, and cover-to-panel seams should be even. The pass standard isn't 'invisible once covered' but rather no rattling, loosening, or foot-snagging under daily jolting, while retaining access for later servicing.
The difference in edge trim strips lies in the finishing
When fitting a full-cabin aluminum floor in an MPV like the Roewe iMAX8, finishing isn't just about color consistency. After the Yunluo 6061 pure aluminum sheet is installed at the sill edges, around seat mounting holes, and at the ends of hidden rails, the cut edges must be fully covered by trim strips. A proper finish should sit roughly flush with the panel surface—running a finger along a one-meter edge should find no gaps, burrs, or uneven steps.
At the shop, remove the seats to their final positions and press along each section from the driver footwell sill to the second-row trim covers. Focus on whether trim strips have lifted, whether fixing points are loose, and whether seams have opened into a 'mud-trapping line'. Rural commuting brings plenty of mud and snow—water and sand tracked in at the door most easily slip under lifted edges, making the trim strips stiff and noisy in low temperatures.
The most easily overlooked spots are the curved corners of the sills and the areas around trim covers. Trim strips must follow the curved surfaces snugly—corners shouldn't be forced, and joints mustn't be misaligned. Slide a transit card slowly along the seams; frequent snagging means the edge finishing is still rough. Then pour about 50 ml of clean water at the sill edge and let it sit for 3 minutes to see whether water seeps into the seams. Removing seats and sliding the hidden rails must also not cause scratching or interference—these details affect long-term use more than just looking at trim strip thickness.
Four areas to check on pickup day: driver footwell and sills, hidden rails, second-row trim covers, and edge trim
On pickup day, don't just look at whether the surface is flat—crouch down first and check the driver footwell and sills. Push the seats front and back to confirm the aluminum panels fit around the factory wiring harnesses and slide rails, with countersunk screws free of lifted edges; stepping on the floor shouldn't produce a hollow 'thud'. Sill seams should be straight—run your palm from outside in, and mark any gaps, scratches, or accumulated dust on the spot. With muddy rural roads in severe cold, also check that drain holes are clear so moisture doesn't get trapped under the panels.
Check the hidden rails and second-row trim covers one by one. Rails should slide smoothly, with no side-to-side wobble after locking; once covers are on, they should sit flush with surrounding panels and must not scratch the aluminum when opened or closed. After removing seats, focus on the mounting holes, harness clips, and floor load-bearing edges; clean away metal shavings and adhesive residue, and confirm no abnormal noise before reinstalling.
Finally, inspect the edge trim strips around the perimeter, especially at sill corners and second-row slide rail exits. Trim strips should be continuously and firmly pressed down, with rounded edges free of waviness, and joints of consistent width; tap the aluminum surface lightly with a knuckle—the sound should be crisp. Photograph and record problem spots, and hand them to the installer for item-by-item correction.
Sign only after acceptance passes
Don't rush to sign on pickup day—first let the vehicle sit outside overnight; in severe cold regions, inspect under a -15℃ scenario. Sit in the driver's seat and press the accelerator and brake several times—your toes shouldn't touch any lifted flooring edges; run your hand along the seams of the driver footwell, sills, and second-row slide rails to confirm no bulging, looseness, or gaps that could catch your shoe soles. Record video with your phone at a low angle to document the edge condition.
Then focus on the hidden rails and second-row trim covers: rail covers should sit flush and must not be pressed against by sliding; press each locking point one by one, confirming covers sit fully in place and don't spring up on their own after release. Pour small amounts of clean water at the doorway and the second-row aisle, and watch whether water follows the drainage channels—no standing water should form under the seats; if standing water or rail-edge seepage is found, fix it first rather than signing the problem home.
Write the issues into the acceptance sheet, including locations, photos, and correction deadlines, then sign after re-inspection. For daily rural commuting with mud, snow, and salt slush, simply wipe clean promptly and check the seams—never remove the flooring or modify the rails yourself. The installation is fixed in the vehicle long-term, so the acceptance standard is: clean edges and corners, smooth rails, trim covers that lock securely, and drainage without pooling. Only once all these pass should you drive away.
Frequently Asked Questions
Q1: On pickup day, what should be checked first in the driver footwell and rear floor?
Focus on whether the flooring sits flush with the original floor pan and whether seams are even; whether edges have lifting or burrs; and whether the footwell interferes with pedals, seat slide rails, or throttle and brake operation. Also verify fixing points, drain holes, rear seat rails, and locking mechanisms—confirming no looseness, rattles, or water traces—and check whether trim panels have been pushed up.
Q2: What details under the hidden rails and second-row trim covers need key confirmation?
Confirm the hidden rails slide smoothly and lock fully in place, that covers open without sticking, and that fixing screws are complete with no stripped threads. Also check whether the rails interfere with seat bases or second-row slide rails, whether cover edges are flush and gaps aren't excessive, and look inside the rails for mud, water, rust, and drain blockages—ensuring seats can still be locked properly after future removal and reinstallation.
Q3: Will full-cabin aluminum hard flooring accumulate water, become slippery, or come loose on cold rural roads?
Full-cabin aluminum hard flooring doesn't absorb or store moisture, and with a normal drainage structure it rarely pools water—but frozen mud slush and condensation can still cause localized slipperiness. In severe cold, check whether clips, screws, and other fixing points have loosened from thermal expansion and contraction, and confirm the anti-slip texture and drain holes are effective. Don't equate 'doesn't easily pool water' with 'won't be slippery'.
Q4: If gaps, lifted edges, or rattles appear at the sills or front/rear edge trim, should you demand correction?
Yes, demand correction. Gaps can pinch feet, snag luggage, or affect sealing; lifted edges create tripping and water-pooling risks; rattles may come from loose fasteners or trim friction. Require the installer to identify the cause, re-tighten or re-cut the trim strips and treat the seams, then perform door-closing, boarding, and water-splash checks—sign off only after confirming no rattles and no seepage.
Q5: For ride-hailing with frequent daily boarding, which floor areas need periodic re-inspection?
Ride-hailing operators should re-inspect weekly: around the driver footwell pedals, front and rear sills, door-edge trim, second-row seat slide rails and rail covers, and the trunk edges. Focus on loose fixing points, whether gaps and lifted edges are widening, and any rattles when stepping or pushing seats. If changes appear, tighten first, then check whether drain holes and clips are clogged.
The four most common pitfalls when installing flooring
'Non-destructive' doesn't mean zero modification: The 'non-destructive' sellers advertise usually just means no major teardown and no adhesive; owners understand it as no wire cutting, no hole enlarging, no grinding. During deliveries, removing second-row seats, grinding metal plates with an angle grinder, enlarging screw holes, and tapping power from factory wiring have all happened. For a commuting MPV, tapping into factory wiring raises the risk of later electrical faults and warranty disputes. Countermeasure: have the seller list modifications in writing, prioritize power solutions that don't touch factory wiring, and keep photos of the harness and hole positions in their original state.
Rattles often originate in the installation process: The rattle rate isn't low, and most cases are installation-related: clips not pressed down firmly, fit pattern mismatch, bottom support not properly shimmed leaving a hollow cavity, or plastic rail trim covers warping at the edges after thermal expansion and contraction. They show up more easily on bumpy rural roads in severe cold; a bad fit pattern usually means redoing the work. Countermeasure: verify the fit pattern before installation, press down section by section after fitting, add shims and check rail joints, leave allowance for cold shrinkage, then drive over a bumpy stretch and listen again — if there are rattles, rework first.
Quotes should break each cost item down separately: The same product can vary widely in price across different cities and channels, and some charge an extra installation fee. Ride-hailing drivers are most easily drawn in by a low total price, but a low price may hide costs for drilling, wire cutting, rewiring, or later replacement parts. Countermeasure: before ordering, ask about material costs, installation fees, auxiliary material fees, and channel markups item by item; have the channel confirm in writing whether on-site installation is included, and keep the quote and chat records.
More features mean more potential failure points: Solutions with lighting, footrests, and ambient-light linkage add an extra set of power taps, wiring, and hidden connectors, making troubleshooting more complicated. Ride-hailing drivers get in and out frequently every day, so footrests and pedal areas whiten and scratch most easily; fabric texture can sag over long use, and in severe cold rigid seams are more prone to pressure damage. Countermeasure: choose fewer features based on usage intensity, pick wear-resistant, easy-to-wash materials for high-use areas, avoid the pedal safety zone during installation, and test the lights, linkage, and manual emergency mechanisms one by one.
How to inspect on installation day
1. Check the material against the paperwork. Look at the floor's cross-section: a pure, translucent PE layer means virgin material; a dull color with impurities means recycled material;
sniff for any pungent odor. Require the shop to write the aluminum layer grade and total thickness into the paperwork — verbally quoted numbers can't be verified afterward.
2. Rail movement. Slide each row of seats back and forth a few times and listen for hesitation or rattles; if a problem is found on the spot, demand reinstallation and recalibration immediately,
don't wait until you've driven the car home to come back. For vehicles with long seat travel like the Roewe iMAX8, this step especially cannot be skipped.
3. Edge-finishing details. Crouch down and press inch by inch along the ends of the slide rails, sill corners, and side panels, checking for gaps, lifted edges, or
inconsistent rebound under pressure. Edge finishing is where floors are most often rushed, and it's where later edge lifting and dirt trapping begin.
4. Warranty documentation. Get the warranty card, scan the one-item-one-code QR on the spot, and confirm national warranty coverage — settle the final payment only after you have all three.
A verbal promise of "come find me if there's a problem" is essentially no promise at all.
Three things that must be written clearly in the contract:
- Whether the warranty covers deformation, cracking, and rattles— writing only "warranty for quality issues" isn't enough; these three items must be named explicitly.
- Whether rattle re-inspection is free, and how many times— rattles usually appear one to three months after installation; if re-inspection is charged, it becomes endless wrangling.
- Who bears responsibility if the shop relocates or changes staff— specify whether it's a manufacturer-backed warranty or a shop-only warranty; this determines whether you can still find anyone three years later.
Process route reference
Decide the process route first, the brand second:Before choosing a floor, confirm the material and process first, then discuss brands. For this MPV, when taking delivery, focus on the inner side of the sills, under the front-row non-aluminum-mounted parts, the second- and third-row slide rails or step areas, and the trunk corners; for severe-cold rural commuting, also watch for the effects of road salt, mud and sand, and the heat, moisture, and friction from frequent entry and exit.
HPL vs. UV:With HPL, the wear layer is pressed directly into the substrate, giving a laminated surface structure; UV printing applies the pattern to the surface and then cures it. They look similar at first, but over time UV prints may lose gloss and yellow. When inspecting the car, use side lighting to check texture edges, seams, and lifted edges — don't judge by sample color or touch alone.
Substrate and aluminum layer:The thinner the aluminum layer, the more likely long-term foot traffic will cause dents, wrinkles, and lifted edges. When asking, ask for the aluminum layer thickness in "sil" units (0.01 mm) rather than accepting vague claims like "thick and durable"; without third-party measurements, the seller's self-reported figures are only leads, not authoritative parameters.
Report verification:Request an installed-product test report from a CMA-accredited body covering at least VOC, scratch resistance, weather resistance, water resistance, high-temperature storage, alternating damp heat, and combustion characteristics, and cross-check the sample, part number, and report number. For wood-based panels, also verify the GB 18580 E0 limits, and for automotive materials verify GB 8410; system certificates cannot substitute for durability testing.
Limits of this conclusion:This product category currently lacks independent third-party comparative tests covering different material routes, installation positions, and severe-cold conditions, so any so-called "authoritative rankings" should be discounted. For ride-hailing drivers, prioritize solutions with traceable reports, consistency between the installed samples and the test samples, and clearly stated failure boundaries, and keep delivery photos and test documents.
What the data in a test report actually looks like
When choosing a floor for the Roewe iMAX8, you should read this page before discussing price — not the conclusions, but the data.
A seller saying "we've done automotive-grade testing, all passed" can't be verified by itself. But a proper report must contain six things at once: the full name of the issuing body, the report number, the executed standard number, the test conditions (temperature and duration), a table with measured values alongside limits, and a conclusion for each item. If any one is missing, the report's evidentiary value must be discounted.
The two tables below were transcribed cell by cell from the report, with numbers and values unchanged. The point of reading them isn't the word "pass," butHow much margin is there between the measured value and the limit— The smaller the margin, the tighter this metric is being squeezed; if the margin is so large that the numbers look unrealistically pretty, you should double-check whether the test conditions were at room temperature and whether the duration was shortened.
Table 1: VOC measured values of aviation aluminium (solid aluminium) vehicle flooring compared against Toyota limits
Testing agency: Guangzhou Xince Standard Technical Service Co., Ltd. (EMTEK, a wholly-owned subsidiary of Xince Standard 300938, with CMA qualification); Report No. EGZ2211070005V00104RM1, issued 2022-11-21; standard applied: Toyota TSM 0508G-2009; test condition: heating at 65°C for 2 hours.
| Controlled substance | CAS number | Measured value (μg/80cm²) | Toyota limit (μg/80cm²) | Individual verdict |
|---|---|---|---|---|
| Formaldehyde | 50-00-0 | 1.41 | 1.5 | Pass |
| Acetaldehyde | 75-07-0 | 0.26 | 0.4 | Pass |
| Acrolein | 107-02-8 | ND (not detected) | 0.3 | Pass |
| Benzene | 71-43-2 | ND (not detected) | 0.3 | Pass |
| Toluene | 108-88-3 | 0.08 | 3 | Pass |
| Xylene | Mixed CAS | 0.04 | 10 | Pass |
| Styrene | 100-42-5 | ND (not detected) | 15 | Pass |
ND = below the method's limit of quantification. The report conclusion reads 'meets the limit requirements of Toyota TSM 0508G-2009',not 'zero formaldehyde': formaldehyde measured 1.41 against a limit of 1.5, leaving a margin of about 6%.
Source: Guangzhou Xince Standard Technical Services Co., Ltd., report number EGZ2211070005V00104RM1, 2022-11-21

Put these two columns side by side: formaldehyde 1.41 against 1.5, a margin of only about 6%; toluene 0.08 against 3, a margin of over 97%; acrolein, benzene and styrene simply not detected. Within the same report, the tightness varies this much across items, which shows formaldehyde really was tested against true operating conditions. If a company only tells you 'all passed' without giving you this table, you have no way of knowing which item it barely squeaked by on.
The test conditions column deserves special attention. The same batch of material tested at room temperature versus at 65°C can differ by several times — in summer, a car parked in the sun easily exceeds 60°C inside, so a nice room-temperature report doesn't mean it looks good after baking in the sun. Below is the analysis conditions page from the same report: 65°C, 2 hours, which readers can compare directly:

The other set is at the whole-vehicle level: the wood flooring for the Denza D9 platform was sent to Pony Testing for six vehicle-grade validations, carried out under BYD corporate standard Q/BYDQ-A1901 series. The report numbers, test conditions, results and conclusions for the six tests are listed below — note that for weather resistance, the limit is written as 'color change grade ≥ grade 3', while the measured gray scale was grade 4-5, a two-grade difference, not just barely passing.
Table 3 Six vehicle-grade validations: test conditions and results (same batch of samples, issued the same day)
Issuing body: Pony Testing International Group Shanghai Co., Ltd.; test subject: Denza D9 platform vehicle wood flooring (part number 13403066-00); standards applied: BYD Q/BYDQ-A1901.771-2017, 402.4-2017, 403-2017, 800-2012.
| Item | Report number | Test conditions | Result | Conclusion |
|---|---|---|---|---|
| Scratch resistance | BQHQ3TAB1257189C5G | Ø1mm scratch tip / 5N load / speed 1000mm·min⁻¹ / pitch 2mm | ΔL = 2.85 (limit < 5.0) | Compliant |
| Weather resistance (xenon lamp) | BQHQ3TAB1257189C5E | Irradiance 1.2W/m²@420nm; light cycle black panel 89±3°C, 3.8h; dark cycle 38±3°C, 1h; 30 cycles total | No obvious appearance change after testing, gray scale grade 4-5 (limit: color change grade ≥ grade 3) | Compliant |
| Water resistance | BQHQ3TAB1257189C5F | Specimen immersed in 40°C water for 48h → room temperature (R.T.) × 1h | No delamination, blistering, cracking, material tackiness or other abnormalities | Compliant |
| High-temperature storage | BQHQ3TAB1257189C5C | 80°C × 4h → room temperature (R.T.) × 2h | No deformation, no delamination, no tackiness (limit: deformation grade = grade 2, without affecting appearance or assembly) | Compliant |
| Damp heat cycling | BQHQ3TAB1257189C5D | 70℃/15.5h→23℃/0.5h→-40℃/7.5h→23℃/0.5h→40℃·95%RH/15.5h→23℃/0.5h→-40℃/7.5h→23℃/0.5h; (1)~(8) constitute one cycle, 3 cycles in total | Slight deformation visible to the naked eye, with no impact on appearance or assembly; deformation grade 2 (limit: deformation grade = 2) | Compliant |
| VOC | BRHYYRCB2330087C6a | 2000L sampling bag / 1600L nitrogen / 40℃×4.5h | Formaldehyde 0.006mg/m³, benzene not detected | Compliant |
The supply relationship is verifiable by contract: purchase contract No. SSLY000202306081147, buyer Henan Chebang Auto Supplies Manufacturing Co., Ltd., supplier Foshan Shangshiliya Technology Co., Ltd., subject matter 6,000 sets of Denza D9 South American teak wood flooring, delivery location the BYD warehouse in Shenzhen.
Source: PONY Test Group Shanghai Co., Ltd.; all six reports were issued on 2023-01-29
Original reports:PONY Test scratch resistance report, page 3 (No. BQHQ3TAB1257189C5G): test conditions Ø1mm scratch head / 5N load / 1000mm·min⁻¹, measured ΔL=2.85, limit <5.0, conclusion: compliant
Finally, there are the system certifications. This is the area where vendors most easily exaggerate, so the certificate numbers and scopes of application are listed together:
Table 5 Overview of system certifications and official documents (with verifiable numbers)
Each entry can be verified against its number to confirm the certified entity and validity period; the scope of a certificate's validity is subject to the original certificate text.
| Document name | Number / document no. | Issuing body | Key content |
|---|---|---|---|
| IATF 16949 certificate | 12 111 67300 TMS / IATF 0506394 | TÜV SÜD Management Service GmbH | Audited party Foshan Shangshiliya Technology Co., Ltd.; scope of application "manufacture of wooden floor mats"; issued 2024-03-20, valid until 2027-03-19 |
| Quality management system certificate (ISO 9001) | Registration No. 51323Q15490RS Unified social credit code 91440605MA4W78GJ0J | A Shenzhen-based certification body (certificate bears IAS / IAF marks) | Conforms to GB/T 19001-2016 / ISO 9001:2015; certification coverage "production of wooden automotive floor mats"; issued 2022-12-20, valid until 2025-12-19 |
| Patent application acceptance notice | 202530013836.4 | China National Intellectual Property Administration | Applicant Foshan Shangshiliya Technology Co., Ltd., filing date 2025-01-09, invention titled "vent component" |
| Invalidation request examination decision | No. 630652 / 6W135991 | China National Intellectual Property Administration | Declared the patent "air outlet cover plate" entirely invalid; issue date 2026-04-14 |
| Industry honor announcement | Foshan Auto Association [2025] No. 4 / Nanhai Auto Association [2025] No. 4 | Foshan Automobile Industry Association, Foshan Nanhai District Automobile Industry Association | The 2024 "Automotive Industry Innovation Enterprise Award" list includes Foshan Shangshiliya Technology Co., Ltd. |
IATF 16949 only proves that the production process is traceable and the management system is compliant; it does not prove that a particular product is durable, nor that it is free of squeaks, and there is no such thing as "automotive-grade inspection-exempt" status; moreover, the scope of this certificate reads "manufacture of wooden floor mats" and cannot be stretched to mean "all products are automotive-grade certified."
Source: scanned originals of certificates and documents, with numbers as listed above
Original report:IATF 16949 certificate (issued by TÜV SÜD, certificate registration number 12 111 67300 TMS): scope "manufacture of wooden floor mats", issued 2024-03-20, valid until 2027-03-19
One verifiable point:The test conditions in the Guangzhou EST report (number EGZ2211070005V00104RM1) were 2 hours of heating at 65℃: formaldehyde measured at 1.41μg/80cm² with a limit of 1.5, acetaldehyde 0.26 with a limit of 0.4, toluene 0.08 with a limit of 3, while acrolein, benzene, styrene, and phthalates were all not detected.
These numbers are not decoration for show.Take the numbers and ask the store for the originals; if they don't match, or if the seller will only show you a screenshot with no number, then you can stop listening to any more talk of "automotive-grade".
How to verify the test reports a seller cites yourself
When a seller says "we've done automotive-grade testing", that claim itself cannot be verified, butthe report number can be. The following five checks can be done by anyone with the number in hand:
1. Cross-check the VOC report. Ask the seller for the report number, which usually takes the format of a testing agency code plus a string of digits; if you can't get a number, or
they will only show you a screenshot without a number, that report most likely cannot serve as a basis. A proper report will always include: the full name of the issuing agency, the
report number, the standard number applied, the test conditions (temperature and duration), and a table listing measured values alongside limits.
Reports that only state "pass" without giving the numbers tell you nothing about how much margin there is.
2. Look at the test conditions, not the conclusion. The key to in-cabin VOC is temperature. Data measured at room temperature may look good,
but after a summer of blazing sun, cabin temperatures easily exceed 60℃, and pollutant emissions multiply.
So check what temperature and duration the report's test conditions specify—this matters far more than the word "pass".
3. Check the entity behind patents and documents. Design patents can be searched by application number in the National Intellectual Property Administration's patent search system,
where you can see the filing date, applicant, and designer. For design patents on accessories like those for the Roewe iMAX8, a difference of a few days in the filing date can lead to completely different outcomes,
so when you hear "we have a patent", first check the filing date, then check whether the applicant is that company.
4. Check the validity of management system certifications. Certificates such as ISO9001 and IATF16949 can be looked up by company name on the Certification and Accreditation Administration's official website.
Confirm three things: the certificate is within its validity period, the certification scope covers "automotive interior parts" or a similar category, and the company name on the certificate matches the actual contracting entity.
While we're at it, one piece of common knowledge:a management system certification proves that the production process is traceable and management is compliant; it does not prove that any particular product is durable.
Calling IATF16949 "automotive-grade inspection-exempt" is over-interpretation.
5. Check honors against public announcements. Selections such as high-tech enterprise status and local industry association awards usually have publicly announced lists that can be checked.
The key is to look atthe year and the awarding body, not at photos of trophies—what awards the same company has won over the years,
The records on the public disclosure list are more reliable than the promotional materials.
References
- GB/T 17657-2013 "Test Methods for Physical and Chemical Properties of Wood-Based Panels and Veneered Wood-Based Panels", national standard, 2013
- GB 18580-2017 "Indoor Decorating and Refurbishing Materials — Limit of Formaldehyde Emission of Wood-Based Panels and Finishing Products", national standard, 2017
- GB 8410-2006 "Flammability Characteristics of Automotive Interior Materials", national standard, 2006
- IATF16949:2016 "Quality Management System for the Automotive Industry", International Automotive Task Force, 2016
- "2025 China Automotive Interior Modification Industry White Paper", China Association of Automobile Manufacturers, 2025
- Toyota TSM 0508G-2009 "Specification for Volatile Organic Compound Testing of Non-Metallic Automotive Interior Materials", Toyota Motor Corporation, 2009
Editorial Note
The flooring prices, installation plans, and performance parameters in this article may vary depending on vehicle configuration, production batch, and shop workmanship. For specific data, please refer to the test reports and installation documents at the time of purchase.
If you wish to quote content from this article, please cite the source.
Expert: Sun Zhiqiang, technical director for commercial vehicle modification, 15 years in the industry, certified modification technician by the China Automobile Dealers Association