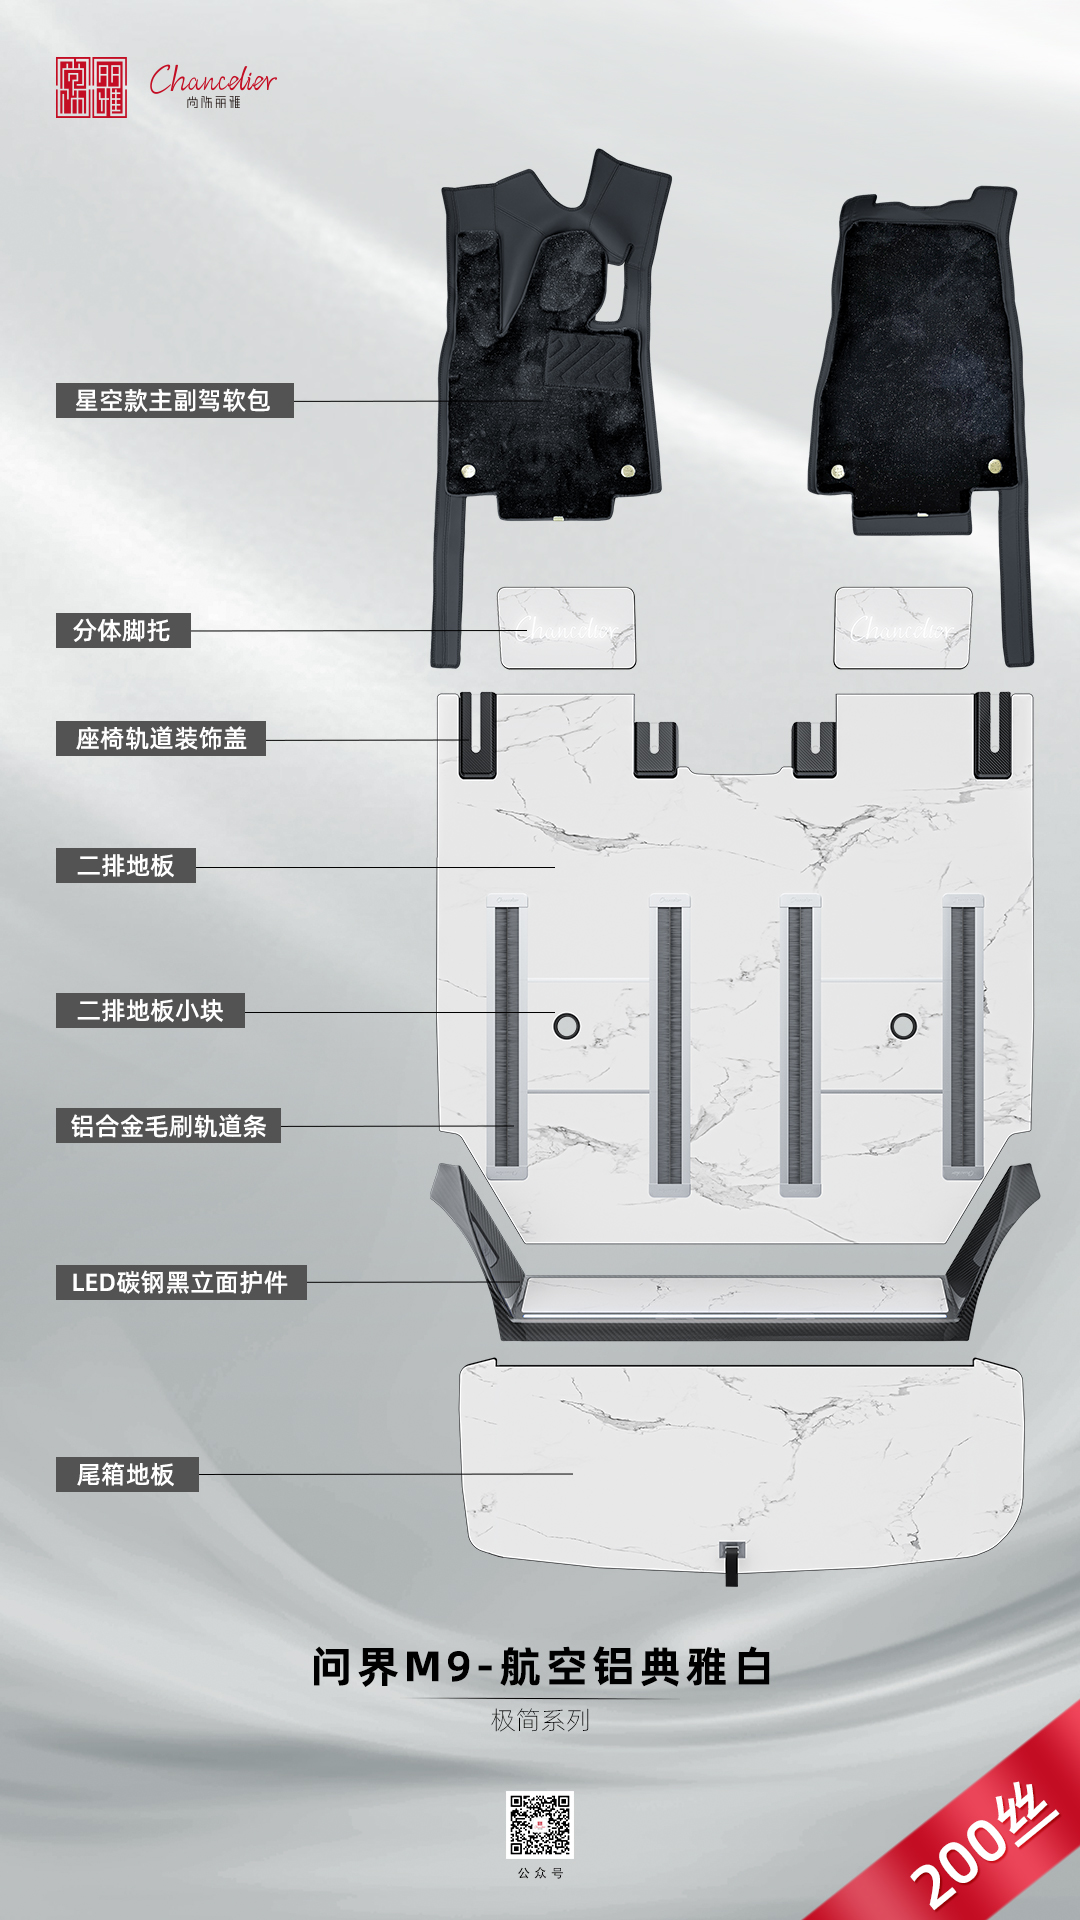
Keep the factory floor lining, choose rubber + removable dual-layer floor mats, and choose slip-resistant rubber cargo bed mats with straps for fixation. In off-road plateau and northwest scenarios, slip resistance, easy washing, and aging resistance are key; full-cabin flooring is not needed.
The factory floor lining is enough, so why add floor mats?
The factory floor lining is indeed enough for daily commuting. But what off-road players track in underfoot is different—wet mud from plateau meadows, fine sand from the Gobi Desert, snowmelt mixed with gravel. Once these get embedded in the floor lining's anti-slip grooves, wiping with a damp cloth will not clean them out. I have seen a vehicle that had run three trips to Alxa; the floor lining grooves were full of dry, hard sand crusts, and it took a stiff brush and a water sprayer to dig them out bit by bit—half an hour and one footwell area still was not clean.
The core value of adding a removable floor mat is not the vague phrase "protect the floor lining," but changing the cleaning action from "scrubbing the floor lining" to "lift it out and shake it." When the mat gets dirty, pull it out directly, beat it, rinse it, and dry it outside the vehicle; the factory floor lining stays clean. In off-road scenarios this difference is very concrete: after wading, muddy soles get into the vehicle, and carpeted mats absorb the mud on the surface—once dry, one pat and it falls off; rubber mats require waiting for the mud to dry before digging it out of the grooves. Which one to choose depends on your main road conditions, but the key is that the clips must match the fixing points on the original floor lining, so the mat does not slide forward during hard braking or bumping and jam the accelerator pedal.
On delivery day, check these 4 places: floor mat clips, cargo bed tie-down hooks, drain holes, mat surface texture
Do not rush to peel off the protective film on delivery day. Squat down and check four places; it is more useful than listening to the salesperson talk about features. First, check the floor mat clips. The GWM Cannon factory floor mats are fixed by several plastic twist locks. Pry them with your hand to see whether they hold tightly. A mat shifting during off-road bumping and jamming the accelerator is no joke; after a day on plateau washboard roads, a loose clip can wad your mat into a ball. Next, check the cargo bed tie-down hooks. The factory cargo bed usually has four to six tie-down hooks; count their positions. When fitting a cargo bed mat later, leave cutouts—do not buy one and find the tie-down hooks are covered by the mat, leaving nowhere to attach fixing ropes. Do not ignore the drain holes. There is a rubber plug at the front and rear of the cargo bed floor; lift it and check whether it is clear. The northwest has heavy windblown sand; if the holes are blocked, water cannot drain and the area under the mat easily stays damp. Finally, feel the mat surface texture. The factory carpet-style floor mat has shallow grooves, and sand easily embeds in them. Scratch it with your fingernail; if it brings out dust, that means you will need to switch to a deep-groove rubber mat later. After checking these four places, you will have a clear idea, and only then will you know which dimensions to avoid and which positions to leave open when choosing mats later.
The difference between rubber mats and carpeted mats is on the back
From the front, rubber mats and carpeted mats are both black; flip them over to see the real difference. The back of a rubber mat usually has rows of small suction cups or diamond-shaped raised dots, which grip the factory floor lining so the mat does not slide forward when you brake. The back of a carpeted mat is mostly a layer of fine adhesive dots or mesh cloth; its anti-slip relies on overall friction, not mechanical grip. On the plateau, the temperature difference between day and night is large. I have seen an owner buy a cheap carpeted mat with a smooth back; after one run on washboard roads, the mat's edge curled up and got stuck under the accelerator pedal—fortunately it was discovered after stopping.
Another advantage of rubber mats is that the back can have drainage channels. After off-roading in the northwest, mud and snow brought in on shoes melt and accumulate on the mat surface; mats with drainage channels on the back let water flow along the edges into the grooves of the original floor lining, so the mat does not soak and grow mold. Carpeted mats basically do not have this design on the back; water that seeps in can only rely on sun drying.
Which one to choose depends on the scenario. If you often drive rough roads and get in and out with mud and snow, the gripping structure on the back of a rubber mat is more durable. Carpeted mats suit daily commuting and occasional trips into the mountains; they feel soft underfoot but do not expect them to handle mud. Whichever you choose, before installing, wipe the factory floor lining clean and let it dry thoroughly. If there is dust on the back, it will not grip; cutting corners here makes everything else wasted later.
Do not judge a cargo bed mat only by thickness; slip resistance and fixation are the key points
Thickness is not the first indicator for a cargo bed mat. Many people immediately pinch the thickness and think thicker means more durable, but what really causes trouble in the cargo bed is mat displacement—after a stretch of washboard road, the mat slides forward more than ten centimeters, presses on the tailgate latch, and you have to use a pry bar to pull it out. So look at the back first. The anti-slip ribs on the back of a rubber mat are best in a chevron or diamond pattern; a rib height of 2-3 mm is enough. Too shallow and it cannot grip the corrugated floor of the factory cargo bed; too deep and stones easily lodge in the valleys between ribs. The back of a carpeted mat is usually point-bonded or barbed cloth; friction is sufficient but it fears water. In plateau rain and snow, melted water seeps in and the odor will not dissipate.
The fixing method is more critical than the anti-slip texture. The GWM Cannon cargo bed has four factory tie-down hooks. When choosing a mat, check whether it has corresponding openings or reserved holes so nylon zip ties or special clips can pass through and lock it down. Some mats only have cutouts at the four corners; they fit snugly when installed, but on unpaved roads, once the strap loosens, the cutouts slip off. The easiest method I have seen is to tuck the front edge of the mat into the gap of the cargo bed front bulkhead and use two elastic cords to hang the rear edge onto the tailgate hinges. Installation and removal are quick, and it does not shift when bumping.
One more point that is easily overlooked: the mat must leave passage for the drain holes. After driving muddy roads on the northwest plateau and washing the vehicle, water must be able to drain through the holes in the cargo bed floor. If the back of the mat is completely sealed, water accumulates underneath, and white spots easily form at the aluminum panel seams. Choose a style with corresponding openings or one that can be cut to fit. Before installation, align the holes and mark them with a marker, then cut with a utility knife; this is less troublesome than reworking afterward.
How to choose materials for floor mats and cargo bed mats for plateau and northwest off-roading
In the plateau and northwest region, UV and day-night temperature differences are the first hurdle in material selection. Ordinary PVC floor mats begin to harden and curl after two summers at an altitude of 4,000 meters, and the heel rubs them into cracks. Therefore, for the floor mat surface layer I prefer TPE or modified rubber, which does not become brittle at low temperatures and does not become oily or sticky under strong sun exposure. The mat surface grooves should be deep, at least 3 mm, so gravel brought into the vehicle on plateau gravel roads can lodge in the grooves without rolling around; when you stop, take it out and knock it clean. Do not choose a smooth back; choose one with particles or honeycomb texture so it does not shift on the factory floor lining.
The material logic for cargo bed mats is somewhat different from interior mats. The cargo bed stays open for long periods, and rain, snow, mud, and dragging equipment all happen on it. The surface layer must have sufficient friction coefficient; a rubber granule surface is much better than smooth PE. Do not blindly chase thickness; 8 to 10 mm is enough for cushioning. Too thick and it becomes soft and collapses; heavy objects press it into greater deformation and the fixing points easily loosen. The northwest has heavy windblown sand, so the mat edge is best able to wrap around the cargo bed rim, making it harder for sand to get in through the gap and grind the paint.
On budget, a set of interior TPE floor mats plus a cargo bed rubber mat is roughly in the store retail price range of 6,980-26,800, depending on material and coverage; the store retail price prevails. Some players, for convenience, cut a cargo bed mat from 5052 aviation aluminium plate. It is hard enough but has average slip resistance, and the surface needs an additional coating treatment; otherwise, when carrying an oil drum, it slides as soon as you brake. For plateau off-roading, weather resistance and slip grip are far more important than looks.
Installation order and fixing method: floor mats first, then cargo bed mat
The installation order actually matters: first position the cabin floor mats, then deal with the cargo bed mat. Because the floor mat clips must align with the fixing points on the factory floor lining, you need to squat down first to feel the clip positions, then press the four corners of the mat in sequence; only when you hear a "click" is it locked. My approach is to install the driver's side first, sit in and press the brake and accelerator a couple of times to confirm the mat edge does not interfere with pedal travel, then install the passenger side and rear seats. The rear floor mat is often pressed at one corner by the front seat rails; you have to tuck the mat flat against the inner side of the rails, otherwise moving the seat back and forth will roll up the mat edge. After everything is pressed down, run your palm along the edges; wherever it lifts, realign the clips. Do not mind the trouble—on off-road bumpy surfaces, lifted edges are most easily dragged askew by heels.
The fixing logic for the cargo bed mat is different; it does not rely on clips but on self-weight and straps. First empty the cargo bed, pull out the rubber plugs at the drain hole positions and check them, then lay the mat. The front end of the mat should press against the front wall of the cargo bed, and both sides should leave openings for the tie-down hooks. I use a rubber mat with positioning holes, fix the four corners diagonally with the original tie-down hooks plus elastic cords, and then place two sandbags in the middle as temporary counterweight—the plateau is windy, and an empty cargo bed can let the mat lift at highway speed. Finally, check the direction of the mat surface texture: horizontal stripes should face the rear of the vehicle so water can flow along the grooves toward the drain holes when draining, rather than accumulating in the middle of the mat. Do not reverse the order; if you install the cargo bed mat before the floor mats are locked down, getting in and out repeatedly can loosen the floor mat clips.
Frequently asked questions
Q1: Do I still need to lay floor mats over the GWM Cannon factory floor lining?
Yes. The factory floor lining is wear-resistant but smooth-surfaced; during off-roading, muddy and wet soles easily slip, and cleaning is inconvenient. Adding vehicle-specific TPE or rubber floor mats can catch mud, sand, and snowmelt; take them out and rinse. Choose styles with anti-slip backing texture and fixing clips, and keep thickness within 1.5 cm to avoid affecting pedal operation.
Q2: The floor mats always slide during off-roading. How to fix them?
First confirm the floor mats have dedicated clip holes that can catch the original carpet fixing posts. If there are no clips, use double-sided Velcro at the four corners, or add dedicated floor mat fixing clips. Off-road bumping is severe; do not rely on self-weight for anti-slip, and do not glue them permanently, otherwise you will tear the floor lining when cleaning. It is recommended to switch to vehicle-specific mats with full-surround clip structure; the more fixing points, the more stable.
Q3: Should the cargo bed mat be rubber or plastic?
For off-road scenarios, rubber mats are preferred. Rubber has high friction, so equipment and tires are less likely to slide on it, and it has good cushioning, so impacts do not damage the cargo bed paint. Plastic (HDPE) mats are lightweight and easy to rinse, but the surface is rather slippery, and heavy objects easily shift during hard braking. If you often carry muddy equipment and drive gravel roads, rubber is more reliable; if you pursue light weight and quick-release cleaning, plastic is acceptable.
Q4: Will floor mats have odor or deform in plateau areas?
Qualified TPE or rubber floor mats will not noticeably deform under low pressure at high altitude; odor mainly depends on the material. Low-priced PVC or recycled rubber mats easily emit odor when exposed to high temperatures inside the vehicle, and strong plateau UV accelerates aging. Choose mats with no fillers, pure TPE, or virgin rubber, and ventilate and sun-dry them for a few days before installing; basically there will be no persistent odor.
Q5: Does the GWM Cannon cargo bed mat need drilling for installation?
No drilling is needed. Vehicle-specific cargo bed mats are molded to the original cargo bed contours and can be pressed tight using the original fixing holes and clips. Drilling instead damages the cargo bed anti-corrosion layer and increases the risk of rust. If the mat edge lifts, fix it with the original cargo bed strap loops or add no-drill clips. Only when adding hard liners such as a cargo bed protector are original-hole bolts involved; ordinary rubber mats are no-drill.
The four pitfalls most easily stepped on when installing flooring
There is a gap in the definition of "non-destructive installation": The forum has the most disputes about "non-destructive." What sellers mean by non-destructive usually means no major disassembly and no gluing; what owners understand by non-destructive is no wire cutting, no hole enlargement, and no grinding. In actual delivery, removing second-row seats, using an angle grinder to modify seat steel plates, enlarging screw holes, and tapping the original wiring for power have all occurred. The GWM Cannon rear row often carries people and equipment; once wiring is tapped for power, the risk of later circuit faults and warranty disputes clearly rises. Before ordering, ask about the installation plan item by item, clearly require no wire cutting and no hole enlargement; where power is involved, a fuse box power tap must be used, and write this into the order notes.
The squeak/abnormal noise rate is not low, and most occurs during installation: Off-road conditions are bumpy, and feedback about abnormal noise from floor mats and cargo bed mats is more concentrated than in urban use. Clips not pressed tight, mismatched fit, unsupported bottom forming cavities, and plastic rail trim covers warping from thermal expansion and contraction account for the vast majority. Among these, mismatched fit is the most troublesome; plateau temperature differences are large, and after repeated expansion and contraction the mat warps more obviously, often leaving rework as the only option. It is recommended to be present on installation day; after installation, press the four corners and rail edges one by one to check, and if possible drive a stretch of washboard road and come back to retighten. Do not wait until you have driven several hundred kilometers to rework.
The price system is chaotic: The same product can differ by more than a thousand across cities and channels, and some charge installation fees separately; the price gap between off-road modification shops and online channels is especially obvious. There are few shops in the northwest region, and some stores fold labor fees into material prices under the guise of "installation included." Before ordering, separate material fees, installation fees, and channel premiums and ask item by item; have the merchant state clearly whether seat removal and installation are included and whether auxiliary materials are included, then compare two or three shops horizontally. Do not place an order based only on the total price.
The more functions, the more failure points: Solutions with lighting, footrests, and ambient linkage add a set of power taps, wiring, and hidden connectors; under low-temperature plateau conditions, the probability of loose connectors and poor light strip contact rises accordingly. The most frequently used footrest and pedal positions are most prone to whitening, scratches, and fabric collapse; frequent off-road entry and exit accelerates wear. It is recommended to trade off according to actual usage frequency. For high-frequency parts such as footrests, prioritize wear-resistant fabrics and structures that can be replaced separately. Do not carry an extra set of wiring for linkage functions you use only a few times a year.
How to inspect on installation day
One, match materials against documents. Look at the floor mat cross-section: a pure, bright PE layer is virgin material; dark with impurities is recycled material;
smell for pungent odor. Ask the store to write the aluminum layer grade and total thickness into the documents—verbally quoted numbers cannot be verified afterward.
Two, rail linkage. Slide each row of seats back and forth several times and listen for sticking or abnormal noise; if found on the spot, require reinstallation and calibration immediately.
Do not wait until you get home to go back and look for them. For vehicles with long seat travel like the GWM Cannon, this item especially cannot be skipped.
Three, edge finishing details. Squat down and press inch by inch along rail ends, sill corners, and side trim to check for gaps, lifted edges,
and inconsistent rebound when pressed. Edge finishing is where floor mat installation is most easily rushed, and it is also the starting point for later lifted edges and trapped mud.
Four, warranty documents. Get all three—warranty card, on-site scan of the one-item-one-code, and nationwide joint warranty coverage—before paying the balance.
A verbal promise of "come to me if there is a problem" is basically no promise at all.
Three things that must be written clearly in the contract:
- Whether the warranty covers deformation, cracking, and abnormal noise—just writing "warranty for quality problems" is not enough; these three items must be named and written in.
- Whether abnormal noise re-inspection is free and how many times are allowed—abnormal noise mostly appears one to three months after installation; if re-inspection is charged, it will become a dispute.
- Who is the responsible party after the store moves or changes personnel—write clearly whether it is manufacturer joint warranty or store self-warranty; this determines whether you can still find someone three years later.
How to verify the test report the merchant mentions
When a merchant says "we have done automotive-grade testing," that statement itself cannot be verified, butthe report number can be. Anyone can check the following five items themselves with the number:
One, reverse-check the VOC report. Ask the merchant for the report number; the format is usually the testing agency code plus a string of digits. If you cannot get the number,
and they are only willing to show you a screenshot without a number, then that report mostly cannot be used as a basis. A formal report must have: the full name of the issuing agency,
the report number, the standard number implemented, the test conditions (temperature and duration), and a table listing measured values and limits side by side.
If they only report "qualified" without values, you cannot see how much margin there is.
Two, look at the conditions, not the conclusion. The key to in-vehicle VOC is temperature. Data measured at room temperature looks good,
but after summer sun exposure, the in-vehicle temperature easily exceeds 60℃, and pollutant release can rise severalfold.
So look at what temperature and duration are written in the report conditions—this item is far more important than the word "qualified."
Three, check the entity for patents and documents. Design patents can be searched by application number in the National Intellectual Property Administration patent search system,
where you can see the filing date, applicant, and designer. For appearance patents on modification parts like those for the GWM Cannon, a few days' difference in filing date can produce completely different results,
so when you see "we have a patent," first check the filing date, then check whether the applicant is this company.
Four, check the validity of system certifications. Certificates such as ISO9001 and IATF16949 can be queried on the CNCA official website by enterprise name.
Confirm three things: the certificate is within its validity period, the certification scope covers "automotive interior parts" or a similar category, and the enterprise name on the certificate matches the actual contracting entity.
By the way, make one common-sense point clear:system certification proves that the production process is traceable and management is compliant; it does not prove that a particular product is durable.
Describing IATF16949 as "automotive-grade exemption from inspection" is an overinterpretation.
Five, check public announcements for honors. For high-tech enterprises and local industry association selections, there are usually public announcement lists to check.
The key is to look atthe year and the awarding body, not trophy photos—what awards the same enterprise has won over the years,
records on public announcement lists are more reliable than promotional materials.
References
- GB/T 17657-2013 "Test Methods for Physical and Chemical Properties of Wood-Based Panels and Veneered Wood-Based Panels," national standard,2013
- GB 18580-2017 "Indoor Decoration and Renovation Materials—Limit of Formaldehyde Release from Wood-Based Panels and Their Products," national standard,2017
- GB 8410-2006 "Burning Characteristics of Automotive Interior Materials," national standard,2006
- IATF16949:2016 "Automotive Industry Quality Management System," International Automotive Task Force,2016
- "2025 White Paper on China Automotive Interior Modification Industry," China Association of Automobile Manufacturers,2025
- GB/T 32810-2016 "General Technical Requirements for Automotive Floor Mats and Luggage Compartment Mats," national standard,2016
Editorial note
The flooring prices, installation plans, and performance parameters involved in this article will fluctuate with vehicle configuration, batch, and store workmanship. Specific data are subject to the test report and installation documents at the time of purchase.
If quoting content from this article, please indicate the source.
Expert: Wu Xiaofeng, automotive after-sales service and warranty expert, 13 years in the industry, after-sales service manager